For this, you do not need an AIO board of any kind.
Required parts are:
- Your build with at least a pi zero, lipo battery and a charger/booster
- An ATTiny25/45/85
- two resistors, size should be between 150K and 1M Ohm each (and they should be the same size)
- an IC socket if you want your tiny re-flashable and safe from being fried by your soldering iron
- some wires
First, the hardware part:
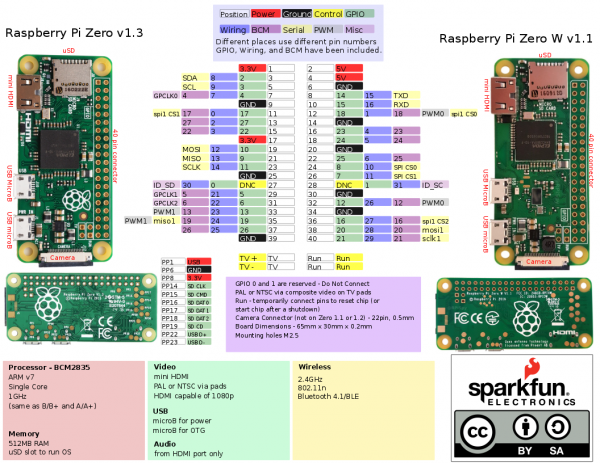
You'll need to make sure the Serial/UART interface pins on the pi are free (RX and TX).
The ATTiny is wired up as following (you should probably solder on the socket and just stick the ATTiny in for easy reflashing):
Tiny
RX -> Pi TX
TX -> Pi RX
VCC -> Pi 3.3V (important, DO NOT USE 5V, RX/TX won't like that)
GND -> Pi GND
Now for the most important part here: The input voltage of the battery is too high for the ATTiny to measure, as it measures relative to its VCC. Batteries can go up to 4V, which means the area from 3.3V-4V is not measurable.
To solve this, we'll use a voltage divider (many thanks to bitbank for this one!).
I'm using pin 3 (Analog Input 3) on the ATTiny:
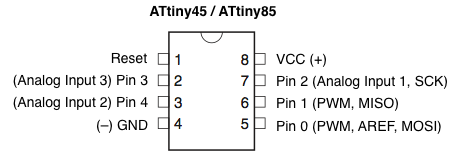
You'll have to connect that pin as follows:
Tiny GND -> Resistor -> Tiny Pin 3 <- Resistor <- Battery +
Now we can measure the battery voltage on the ATTiny, here's the sketch you can flash onto it:
Code: Select all
#include <SoftwareSerial.h>

char i;

SoftwareSerial mySerial(0, 1); // RX, TX

void setup()
{
  mySerial.begin(115200);
  delay(100);
}

void loop()
{
  int sensorValue = analogRead(A3); // read the input on analog pin 0:
  if(mySerial.available())
  {
    if(mySerial.read() != -1)
    {
      mySerial.println(sensorValue);
    }
  }
  delay(10);
}
Once it's connected to your Pi (see above), you can then install the software from here:
https://github.com/HoolyHoo/gbzbatterymonitor
Ignore the part about a hex file, that's for using Helders AIO board. Just run the install script like it says in the readme.
You probably will need to modify the script HHBatteryMonitor.py.
Replace every occurence of "/dev/ttyACM" with "/dev/ttyAMA" (without the quotation marks, of course).
Also, you may have to modify the x and y coordinates for pngview (it was offscreen for mine).
Once you're done, open raspi-config and disable the serial console, but enable the interface. If you want to make sure it's on, check "/boot/config.txt" for the line "enable_uart=1". In case it itsn't there, add it by hand.
Now you just have to reboot and you should have a battery monitor in the top right corner of your screen.
Here's how it looks in my build:


