
Introducing the latest to the bracket family. Made to house a PSP1000 joystick as well as the usual SNES style buttons and screen holder.
Bracket mounts as usual. The PSP joystick is kept from pivoting with small plastic pin in the bracket which goes in PSP hole mount. In the other hole mount of the PSP you just need a very small screw to keep it secure (not included). Kite or Helder's board sits flush with PSP joystick keeping the PSP from coming out once secured. Bracket is a perfect fit.

Here are a few more pics of the internal mounted in the shell.
Internal MountShow
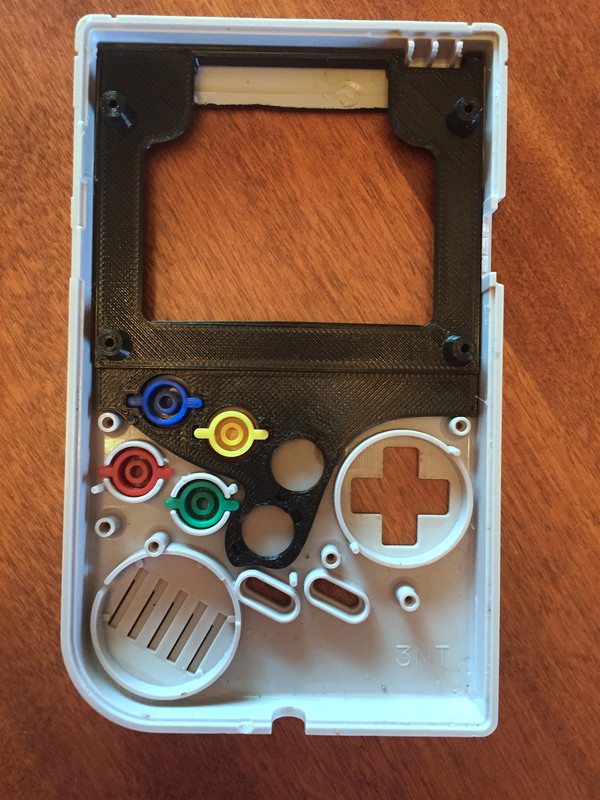
This is the six button bracket to go with Kite's new SAIO. It works the same as the other brackets. The only difference is that one extra post from the shell needs to be removed. Not a big deal but the post lies where one of the extra buttons would be. Does not change functionality of the board or bracket. Here is a picture of the bracket:
6 Button BracketShow
NEW 6 Button Layout for Kite's New SAIO
I have added order links at the bottom with the rest of the brackets. Thanks for watching.
I have added order links at the bottom with the rest of the brackets. Thanks for watching.
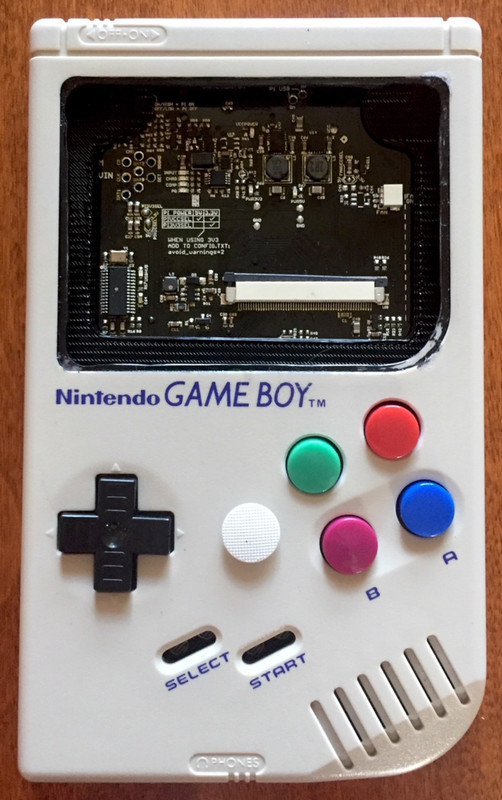
I've made two versions for now. The first is probably the most common one with the SNES style buttons and wells for it.
SAIO SNESShow
- HoolyHooSNES-SAIO.png (837.98 KiB) Viewed 134742 times
SAIO Screen Bracket OnlyShow
- HoolyHooBracketOnlySAIO.png (189.1 KiB) Viewed 134742 times
Inside Bracket AlignmentShow
- Inside.jpg (282.63 KiB) Viewed 134742 times
Outside ViewShow
- Outside.jpg (527.06 KiB) Viewed 134742 times
If your having issues with well alignment on your print, use these included STL at the bottom in the attachments as that will center your print well holes to center.
Well Guide Alignment ToolShow
- WellGuide1.jpg (285.5 KiB) Viewed 133991 times
- WellGuide2.jpg (958.9 KiB) Viewed 133991 times
I know some have asked for the vertical/joystick style and maybe in the near future I'll make it but I just don't have a way to test it as I am not making my build in that style. Also keep in mind that I designed this on my printer and to that tolerance with PLA so if you print it and it doesn't line up or is to tight then maybe try scaling it as different printers and material behave differently . I used these settings:
- Material: PLA
Nozzle Size: .4 mm
Layer Height: .2 mm
Wall Perimeter: 2
Bottom Solid Layers: 3
Top Solid Layers: 3
Infill: 30%
Supports: Yes
Print time on my printer at 40mm/sec: 1 hour
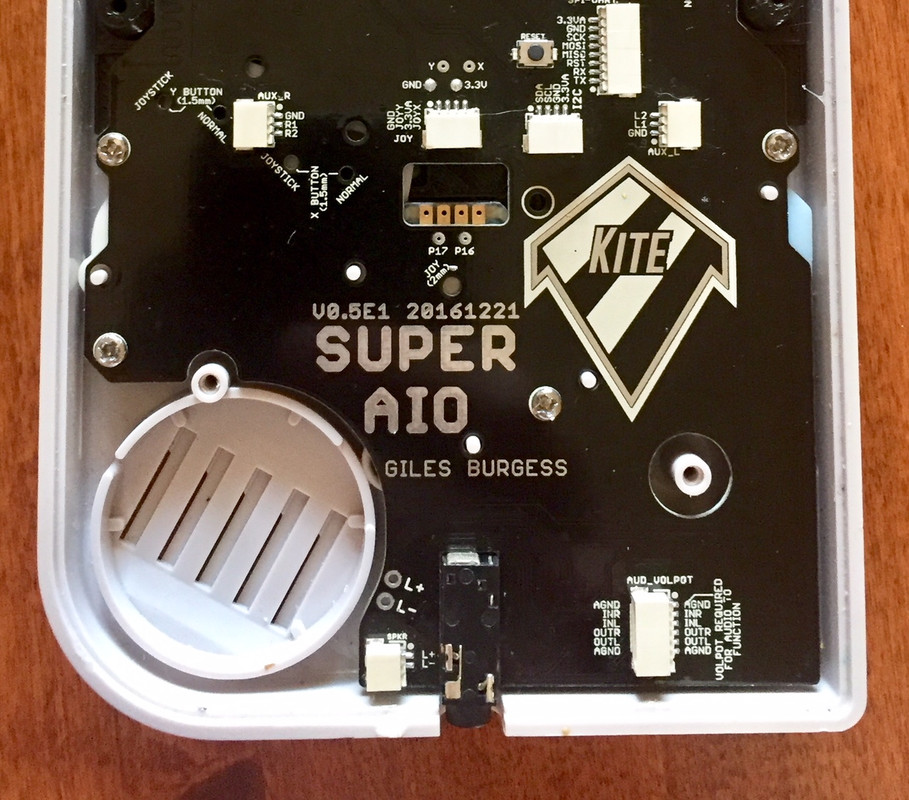
Good News: Also works with Helder's latest board
I tested the SNES screen bracket with wells on Helder's latest board and it works just as good. The only thing is since there are four post on the bracket you obviously can't put the L1 and R1 buttons where Wermy did it in his build unless you want to remove the bottom post of the brackets which is doable. Also screen has to be mounted upside down and flipped in software which is no big deal. Everything else works great including the X and Y button holes which line up as I expected. Here is a photo.
SNES Bracket with Helder's BoardShow
- ScreenHelder.jpg (1.51 MiB) Viewed 131903 times
For PSP Style Bracket with Included Button Well Guides ($16) for US Shipping Only with Tracking ($3.50):

For PSP Style Bracket with Included Button Well Guides ($16) EU Int. non UK Shipping Only No Tracking ($5):
International Order only accepted through PM!For PSP Style Bracket with Included Button Well Guides ($16) EU Int. non UK Shipping Only with Tracking ($8):
International Order only accepted through PM!For 6 Button Style Bracket with Included Button Well Guides ($16) for US Shipping Only with Tracking ($3.50):
For 6 Button Style Bracket with Included Button Well Guides ($16) EU Int. non UK Shipping Only No Tracking ($5):
International Order only accepted through PM!For 6 Button Style Bracket with Included Button Well Guides ($16) EU Int. non UK Shipping Only with Tracking ($8):
International Order only accepted through PM!For SNES Style Bracket with Included Button Well Guides ($15) for US Shipping Only with Tracking ($3.50):
For SNES Style Bracket with Included Button Well Guides ($15) EU Int. non UK Shipping Only No Tracking ($5):
International Order only accepted through PM!For SNES Style Bracket with Included Button Well Guides ($15) EU Int. non UK Shipping Only with Tracking ($8):
International Order only accepted through PM!For Screen Only Style ($13) for US Shipping Only with Tracking ($3.50):
For Screen Only Style ($13) for EU International non UK Shipping Only No Tracking ($5):
International Order only accepted through PM!For Screen Only Style ($13) for EU International non UK Shipping Only with Tracking ($8):
International Order only accepted through PM!Four DIY Install Loose Brass Inserts (Only with Bracket Orders) ($1):
Four of Each DIY Install Brass Inserts and M2 Screws Loose (Screws Need to be trimmed to size) ($3):
Please note, if you choose not to use tracking for international shipping, I cannot be responsible for orders lost in post.
Brass inserts and screws are not included but I have extras if you want them for a small fee (See order link above. Screws will need to be trimmed to size. Best way to do that is screw the brass insert in the screw past your cut point and with sharp cutting snip pliers snap it cut. Screw is very thin so should be really easy. Unscrew the brass insert and it should clean off any bur you might have left.).
Keep in mind these prices are mostly for my time as I don't have a commercial printer and as I mentioned it takes about an hour to print plus the time to clean up the supports, package it and ship it.
If you do have a printer here are the files and give it a go.
I would recommend you print the bracket before drilling your holes to ensure alignment. If it's off just a little from kites center drill markings then make your holes based off your printed bracket center holes. What's important is that the drilled holes and your bracket holes align.
If Downloading, Please Consider Using the Button

AttachmentsShow
Brass Inserts (Please Read!)
For those purchasing the brass inserts you need to be very careful inserting them as they are tiny and too little heat will take too long and melt the entire post and too much heat will clog the threads. Best way I found to do it is insert a 6mm m2 screw with the insert on. Make sure screw is screwed about 1 mm past insert. Screw in the screw to the post until brass insert touches the post. Now apply a soldering iron at about 700 F to top of screw vertically and slowly push it in until insert is flush with top of post. I used a chisel tip as it fits in the screw head. Wait for part to cool then unscrew the screw. Should look like my part above.
It is very important your screws are long enough to make it to the metal inserts but not long enough were you bottom out the screw when it is fully tightened as that will put to much pressure and may break your part. I can't be responsible if you melt or over tighten your part.

