shesaysidontlisten GBZ First Build Log [WIP]

Show off your completed Game Boy Zero, or post your build logs here!
ICMF
Posts: 279
Joined: Mon Mar 06, 2017 1:52 pm
Has thanked: 3 times
Been thanked: 97 times

Re: shesaysidontlisten GBZ First Build Log [WIP]

Post by ICMF » Mon Sep 18, 2017 12:56 pm

shesaysidontlisten wrote:
Mon Sep 18, 2017 12:19 am
I had it in my head that people had the OS on the micro SD in the pi, then also had a second card reader (often in a gutted Gameboy cartridge) that contained the ROMs. They are only using one card total? How did I miss that? Are people unsoldering that micro reader?
Ah, okay, I get you now.

A few things...

You can only* run one MicroSD card at a time. So those builds that have a MicroSD in a removable cartridge, it's functioning like a really complicated extension cord - basically one of these:
Image
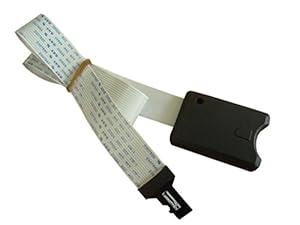
except it has the cartridge connection inserted in the middle. You can see this in wermy's 'GBZ with custom parts' build - he wires the Pi's MicroSD card reader pins to the cartridge socket from a Game Boy, which connects to the PRS cartridge, which has traces that lead to a card reader mounted on the cartridge.

But they're not adding a second MicroSD. They're just moving it to a different location.

So in that vein, no, you don't need to remove the on-board card reader. The reader is connected to test pads underneath, so you can connect an alternate card reader to those test pads and bypass the one on the Pi. More info here: https://othermod.com/raspberry-pi-zero- ... d-adapter/ Note that this does not give you TWO functioning card readers - the Pi can't handle that so you can only use one at a time.

Now, just to add to your confusion... :D You *can* store ROMs on a USB storage device. It's not the standard method - most people load the ROMs onto the MicroSD card itself - but it can be done: https://github.com/RetroPie/RetroPie-Se ... -USB-drive

Lastly, motor tools... My preference for cutting plastic is a crappy knockoff I bought for $10 at Radio Shack at least 15 years ago. I have an actual Dremel, but for cutting plastic it spins far too fast, with too much torque; it doesn't cut plastic, it melts it. The crappy knockoff spins way slower, so it will actually cut and sand plastic. Although frankly, for the cutting involved in a GBZ, I think hand tools would be a better option - pin vise, razor saw, scribing tool and some jeweller's files should be all you really need and will give much smoother edges.

shesaysidontlisten
Posts: 128
Joined: Wed Sep 13, 2017 5:24 pm
Has thanked: 28 times
Been thanked: 10 times

Re: shesaysidontlisten GBZ First Build Log [WIP]

Post by shesaysidontlisten » Mon Sep 18, 2017 1:37 pm

ICMF wrote:
Mon Sep 18, 2017 12:56 pm
snip
That makes perfect sense! Phew, thanks for clearing that up.

I really want to go the cartridge reader route, but I might be putting L and R under it and block that off. We will see. I have kinda larger hands and want to make sure it is comfortable for a long plane ride session. :)

I kinda liked the idea of having a SNES cart and a NES cart, etc, but not if it means an uncomfortable L/R button layout.

This project is already really complicated, so I'll probably skip anything I can't live without. Putting everything on the one card, including ROMs, sounds like the way for me to go.

shesaysidontlisten
Posts: 128
Joined: Wed Sep 13, 2017 5:24 pm
Has thanked: 28 times
Been thanked: 10 times

Re: shesaysidontlisten GBZ First Build Log [WIP]

Post by shesaysidontlisten » Mon Sep 18, 2017 4:14 pm

So it looks like I got variant 8 for my BW screen. Board seems plenty small, sigh of relief on that front.
20170918_142432-1328x747.jpg
20170918_142432-1328x747.jpg (201.68 KiB) Viewed 6370 times
I can't quite tell from the photo from the wiki, but it looks like I just have to move the red to that inner most leg of the chip shown in this pic. http://www.sudomod.com/wiki/index.php?t ... 8_Mod1.jpg

This presupposes that I can remove the screen without ruining everything though. :)

shesaysidontlisten
Posts: 128
Joined: Wed Sep 13, 2017 5:24 pm
Has thanked: 28 times
Been thanked: 10 times

Re: shesaysidontlisten GBZ First Build Log [WIP]

Post by shesaysidontlisten » Wed Sep 20, 2017 10:45 am

I am getting lost remembering what parts I have, have ordered and still need.

The list:
SpoilerShow
Exterior
Case - Ordered
Buttons and Pads - We will see what comes with case and also looting from a gamepad
On/Off Switch
Screen glass
Game case

Interior
Pi - Ordered
Wiring - Have 22AWG for power stuff, 30AWG for all else and some ribbon cable if it is necessary (30AWG?)
Powerboost - Arrived
Board - Arrived (will need to manually do L/R)

Speaker - Ordered
Amplifier - Ordered
Low-pass filter - Parts ordered
Headphone Jack - Ordered
Micro port - Ordered

Screen - Arrived and not giant board (yay!)
SD card
Volume wheel - Ordered
Power strip - Ordered
If anyone sees an obvious omission please let me know!

Might have time the next few nights to start solder school.

I am torn on the glass thing. I went with a black case, but I think I want a screen protector with a black border and the dot matrix text, but I think most are black with Game Boy Zero or other text. I'll go through the for sale board later and see if anyone made this.

I'm also debating color scheme stuff and am not sure what I want for color on the on/off switch, d-pad and start/select buttons. My gut says dark grey for all three, but I don't know if anyone has any dark grey. Kitsch bent appears out of this color, at least for now. Might mock it up on paint to see what it would look like.

User avatar
YaYa
Posts: 1719
Joined: Mon Jun 26, 2017 12:42 pm
Location: brittany - France
Has thanked: 871 times
Been thanked: 689 times
Contact:

Re: shesaysidontlisten GBZ First Build Log [WIP]

Post by YaYa » Wed Sep 20, 2017 12:35 pm

You might take a look at https://www.deadpanrobot.co.uk also for your buttons and screen cover
Follow me on instagram Image

shesaysidontlisten
Posts: 128
Joined: Wed Sep 13, 2017 5:24 pm
Has thanked: 28 times
Been thanked: 10 times

Re: shesaysidontlisten GBZ First Build Log [WIP]

Post by shesaysidontlisten » Wed Sep 20, 2017 1:01 pm

YaYa wrote:
Wed Sep 20, 2017 12:35 pm
You might take a look at https://www.deadpanrobot.co.uk also for your buttons and screen cover
Being in the states the shipping can be atrocious, but I know if they have the perfect parts and I don't use them it will bother me.

A few more parts came today like the gamepads I'm going to gut. I am strongly considering doing the actual SNES shoulder buttons above the battery compartment, but that will be a lot more modification than I was originally anticipating. Will have to slap together something to hold the hinges to allow them to operate and feel good. We'll see how I feel when I eventually get to that point. The controllers are black, so they would look decent if I go that route.

ICMF
Posts: 279
Joined: Mon Mar 06, 2017 1:52 pm
Has thanked: 3 times
Been thanked: 97 times

Re: shesaysidontlisten GBZ First Build Log [WIP]

Post by ICMF » Wed Sep 20, 2017 2:59 pm

You're missing tact switches for L&R, and a battery.

shesaysidontlisten
Posts: 128
Joined: Wed Sep 13, 2017 5:24 pm
Has thanked: 28 times
Been thanked: 10 times

Re: shesaysidontlisten GBZ First Build Log [WIP]

Post by shesaysidontlisten » Wed Sep 20, 2017 3:51 pm

ICMF wrote:
Wed Sep 20, 2017 2:59 pm
You're missing tact switches for L&R, and a battery.
Battery! Yes! I had been mulling that one over. I don't know what will fit yet since I'm doing L/R above battery bay.

I am planning to use L/R from a SNES wannabe controller. If this idea crashes and burns I will order some of those. I'm planning to measure 40 times and cut once...

Thanks for double-checking! :D

shesaysidontlisten
Posts: 128
Joined: Wed Sep 13, 2017 5:24 pm
Has thanked: 28 times
Been thanked: 10 times

Re: shesaysidontlisten GBZ First Build Log [WIP]

Post by shesaysidontlisten » Sun Oct 01, 2017 9:52 am

So I was out of town for a while and a bunch of stuff showed up while I was gone. I now have the batteries ordered as well. Oh, and speakers. Word to the wise to read the description very carefully for everything you order.

Anyone have a good case mod to make this speaker work? Hahahah!
20171001_084541.jpg
20171001_084541.jpg (375.97 KiB) Viewed 6241 times
I'm waiting on some parts I ordered from wermy a while back, but since I bought some SNES style controllers I'm gonna practice my Dremel skills and see if I can steal the button wells out of them.

Also dissected the BW screen so I'm down to just the screen and board. There's a ton of adhesive on the border. Considering taking it all off with some GooGone since it shouldn't mess with the screen. Anyone done this?

I also just realized I am missing a power switch. I am using the safe shutdown module for the powerboost, but who knows when that will arrive from the UK. Not sure of a safe way to test without it for now. I guess I can skip the whole battery and use a power adaptor if I get that far before it arrives.

User avatar
YaYa
Posts: 1719
Joined: Mon Jun 26, 2017 12:42 pm
Location: brittany - France
Has thanked: 871 times
Been thanked: 689 times
Contact:

Re: shesaysidontlisten GBZ First Build Log [WIP]

Post by YaYa » Sun Oct 01, 2017 9:55 am

I suggest you to put the speaker right in the screen hole and you'll make a good subwoofer with the shell :lol: :lol: :lol: :lol:
Follow me on instagram Image

Post Reply

Who is online

Users browsing this forum: No registered users and 1 guest