Page 1 of 2
How to setup sd card with prepared retropie image
Posted: Wed Jul 19, 2017 1:28 pm
by Kyran
I'm needing help(setup script) for my sd card that I already have full of games
Re: How to setup sd card with prepared retropie image
Posted: Wed Jul 19, 2017 1:57 pm
by silentjames
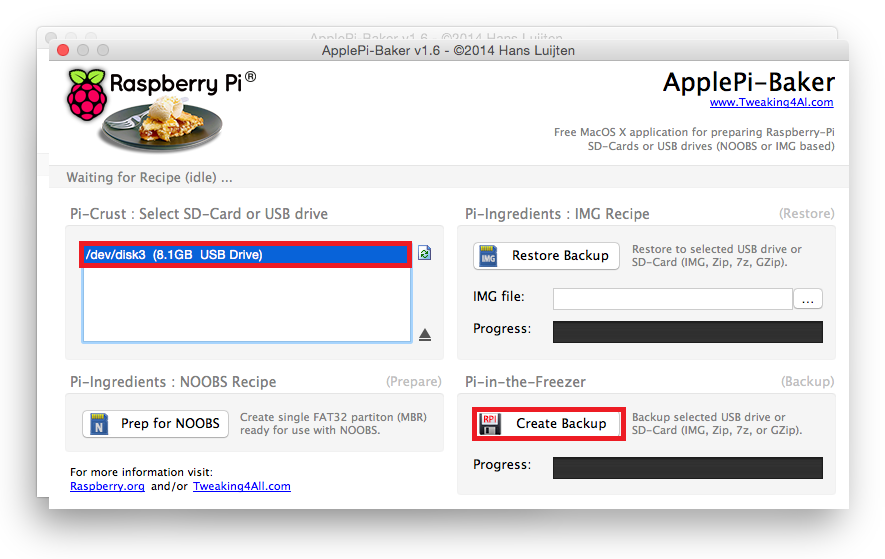
As I understand, some apps we use to burn fresh RetroPie image can also create a backup with your own configured and installed settings/games/themes/etc. For example, I use ApplePi-Baker for images, and It has "Create Backup" feature.
At the same site where I found this screenshot, I've also found the guide:
https://www.htpcguides.com/easy-resize- ... th-ubuntu/
Re: How to setup sd card with prepared retropie image
Posted: Wed Jul 19, 2017 2:00 pm
by wermy
Re: How to setup sd card with prepared retropie image
Posted: Fri Jul 21, 2017 1:29 am
by affensause
My problem though. I see post etc but when the mintpy splash comes it just stops. Got it one time to show the sudomod vid and then it stopped again. I cant get it to boot into emulation station. Tried 3 SD cards, etcher, SDFormatter, Win32DiskImager. Normal retropie 4.2 I get to boot into emulationstation when nothing is connected to USB and I use the HDMI output. But it does not reconize my keyboard

controller all solder points and they are pretty good and all connections are there. Also tried it from another computer. Same issue
Re: How to setup sd card with prepared retropie image
Posted: Fri Jul 21, 2017 1:57 am
by Helder
Do a fresh Retropie install from the original website then once it's burned put the mintyPi folder into the SD card and edit the wpa config file with your network info then use putty to run the install scripts.
Re: How to setup sd card with prepared retropie image
Posted: Fri Jul 21, 2017 8:26 am
by wermy
If you have a mini HDMI adaptor, try plugging it into a TV to see if it continues booting.
Re: How to setup sd card with prepared retropie image
Posted: Fri Jul 21, 2017 7:46 pm
by affensause
Thanks both. Solved. Horrible that the pi died once it was all soldered. It worked with fresh retropie before soldering, broke and does not work anymore in removed (desoldered state). Took another pi, soldered it and finished my build just a few minutes ago.
Btw: As Select + L or R are now used for volume, how are save states working now in retropie? 
BTW: Broke 6 Solderpads from Helders board and thought...you not taking the second one.... So I solderes wires directly to the testpads and it still does fit together pretty well

Thanks for making the testpads. Real dummy and fool proof concept!
Re: How to setup sd card with prepared retropie image
Posted: Fri Jul 21, 2017 8:29 pm
by wermy
Glad you fixed it (and yeah the test pads are a life saver)! For save states, you can still get to them by pressing select + x to access the quick menu while in game. You can save/load state from there.
Re: How to setup sd card with prepared retropie image
Posted: Sun Jul 23, 2017 7:32 pm
by Lphillimore
Just to make this clear as I am seeing 'image' and 'script' bandied around the forums a lot in reference to new builds.
1) SD Card Image (as prepared by Wermy) - Contains everything you need for a fresh build. Once imaged, you can amend your .conf file to setup wireless (headless mode).
2) Setup Script - for use on an exisiting image / build and to incorporate the relevant mintyPi drivers etc to ensure screen works, for example.
Re: How to setup sd card with prepared retropie image
Posted: Mon Jul 24, 2017 9:37 pm
by alphajl7
I am having a bit of a different issue, with a fresh SD Image by Wermy everything works fine on the mintypi. If I use my own Image and run Wermys script everything works great in my pi 3 but just get a black screen on my mintypi?