JujuPi Build - Pi 3 version (IN PROGRESS)

Show off your completed Game Boy Zero, or post your build logs here!
Post Reply
User avatar
JujuPi
Posts: 51
Joined: Mon Nov 21, 2016 2:08 am
Has thanked: 8 times
Been thanked: 16 times

JujuPi Build - Pi 3 version (IN PROGRESS)

Post by JujuPi » Thu Jan 12, 2017 8:31 am

FIRST OF ALL WE SHOULD THANK WERMY FOR INTRODUCING THIS CONCEPT TO US. We appreciate your hard work to maintain this website and show us how it is done! :D :D


Welcome all to my build log!

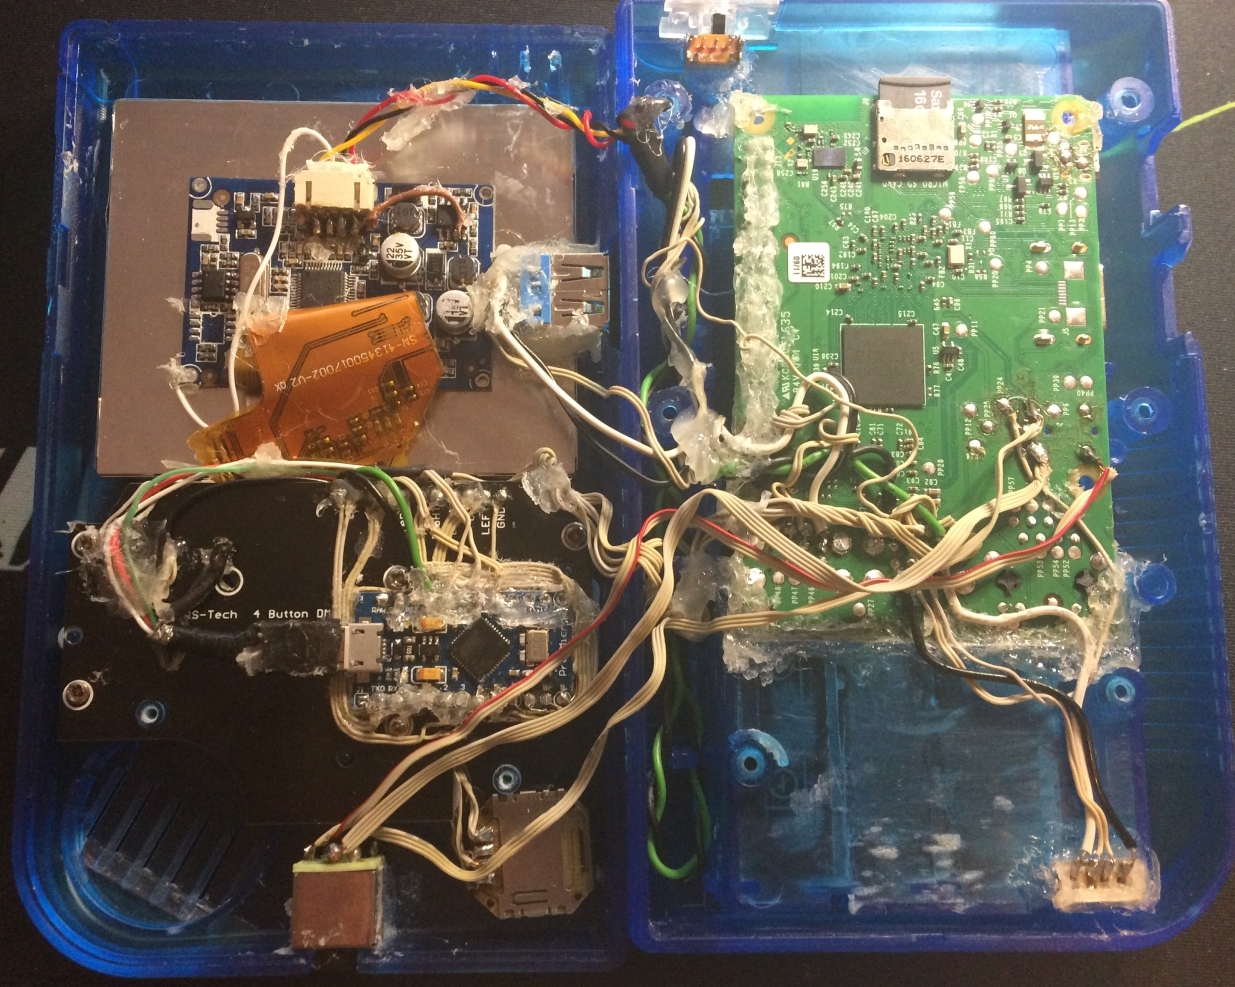
I am building a Gameboy Zero which uses a Pi 3 similar to Sota! I have tried to differ my design in some ways:
  • 1. Not cutting up the board at all!
    2. Using minimal custom components bought from the market (ie you do everything yourself)
    3. Using a Pro Micro instead of a Teensy (kutos to Sota!)
    4. AND ALOT OF OTHER THINGS THAT I AM STILL CHANGING :P
This is my parts list so far:

Image

NOT COMPLETE!


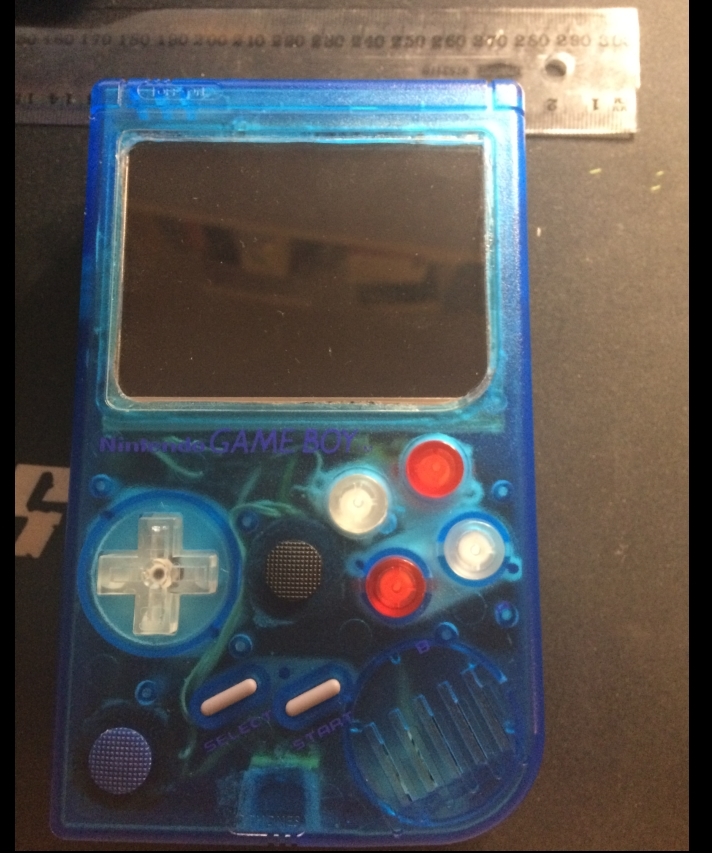
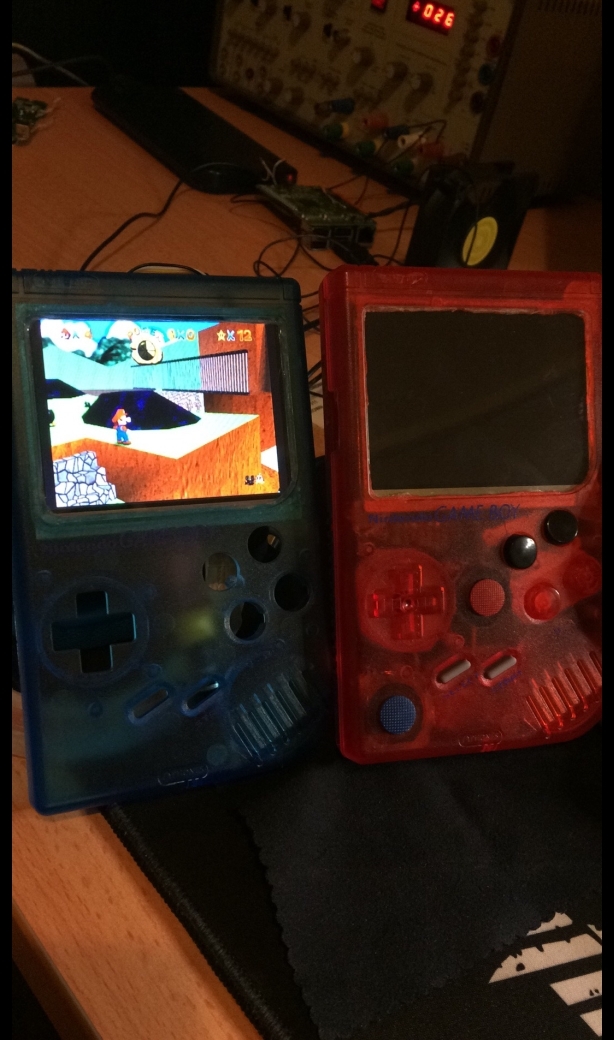
Here are some photos for your very own eyes:

Image

Image

Image

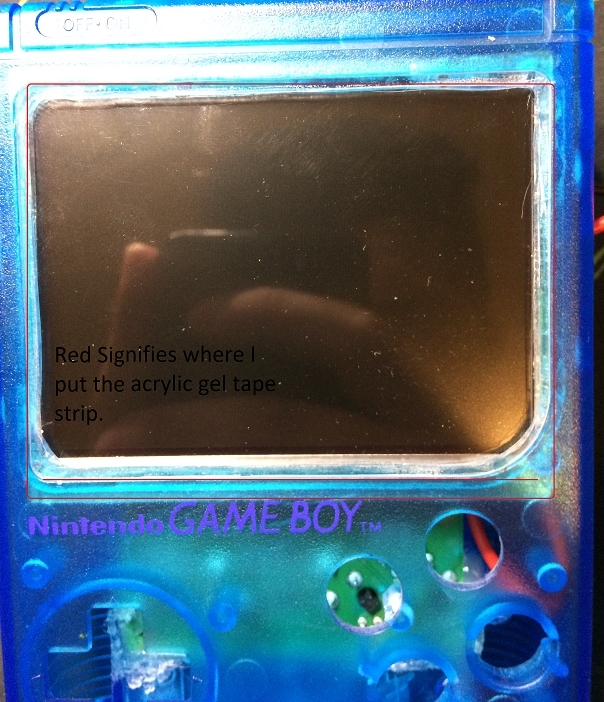
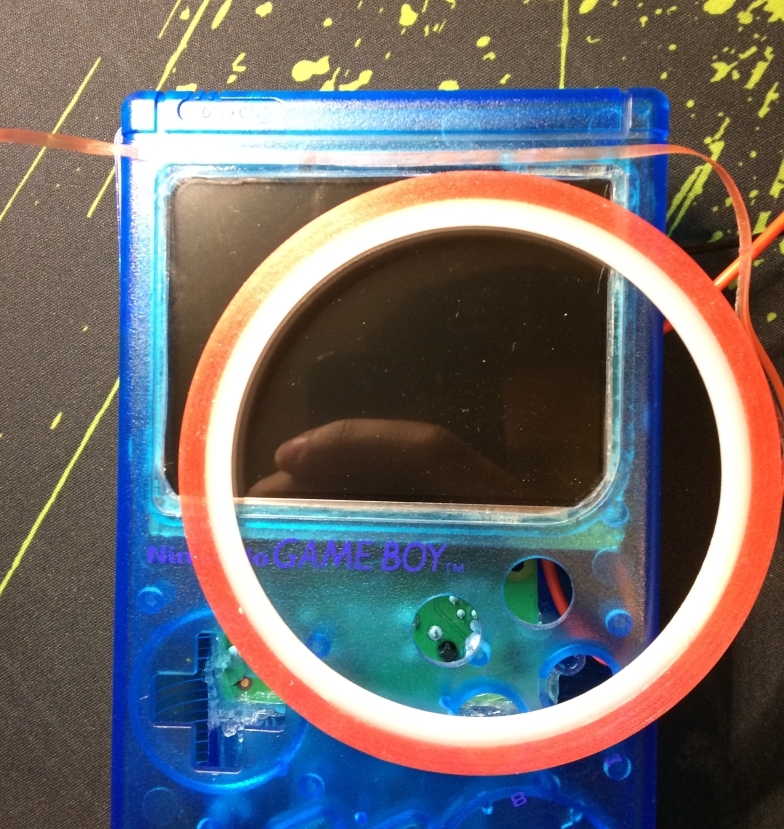
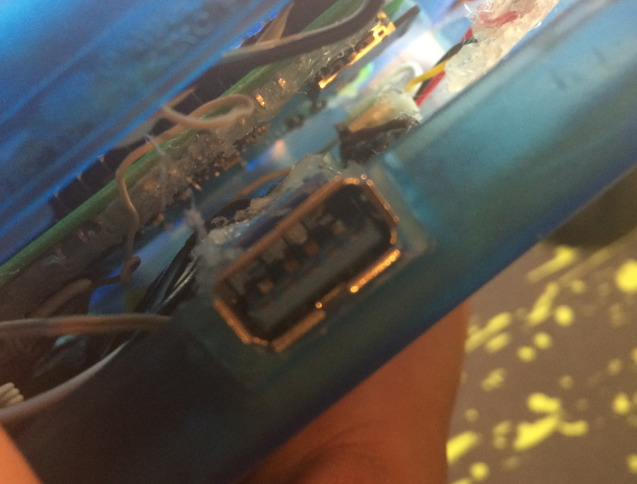
Do you notice this photo shows the difference between using acrylic gel tape used for phone screen replacement rather than hot glue? BIG DIFFERENCE! Also can be used to tape the screen protector down!

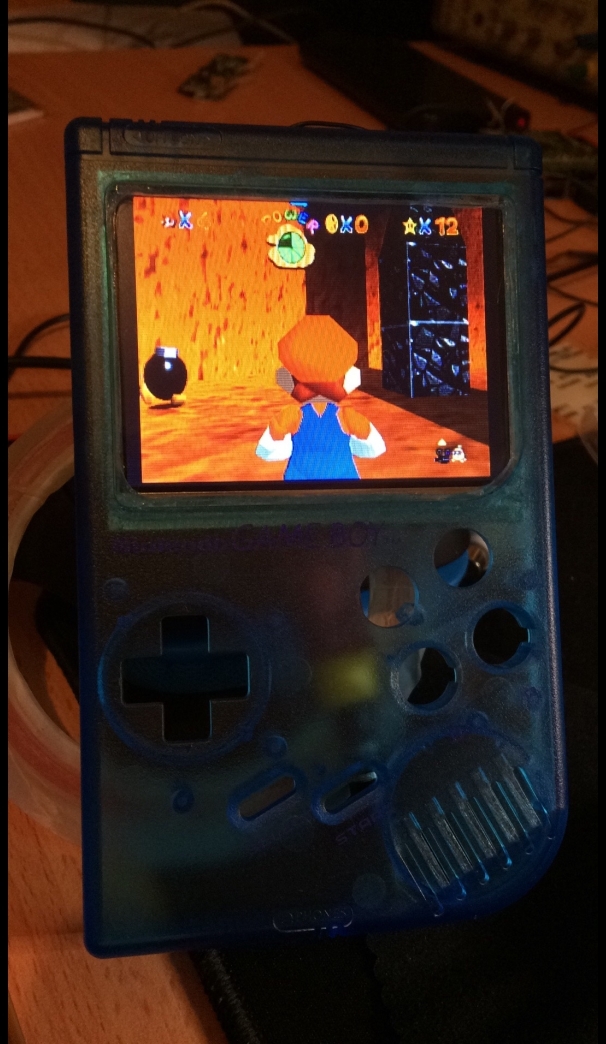
Believe it or not, this is Super Mario running at full speed no issues WITH a HD texture pack! (Photos not doing it any justice, I will take some high res shots soon!)

Image

Image

Image

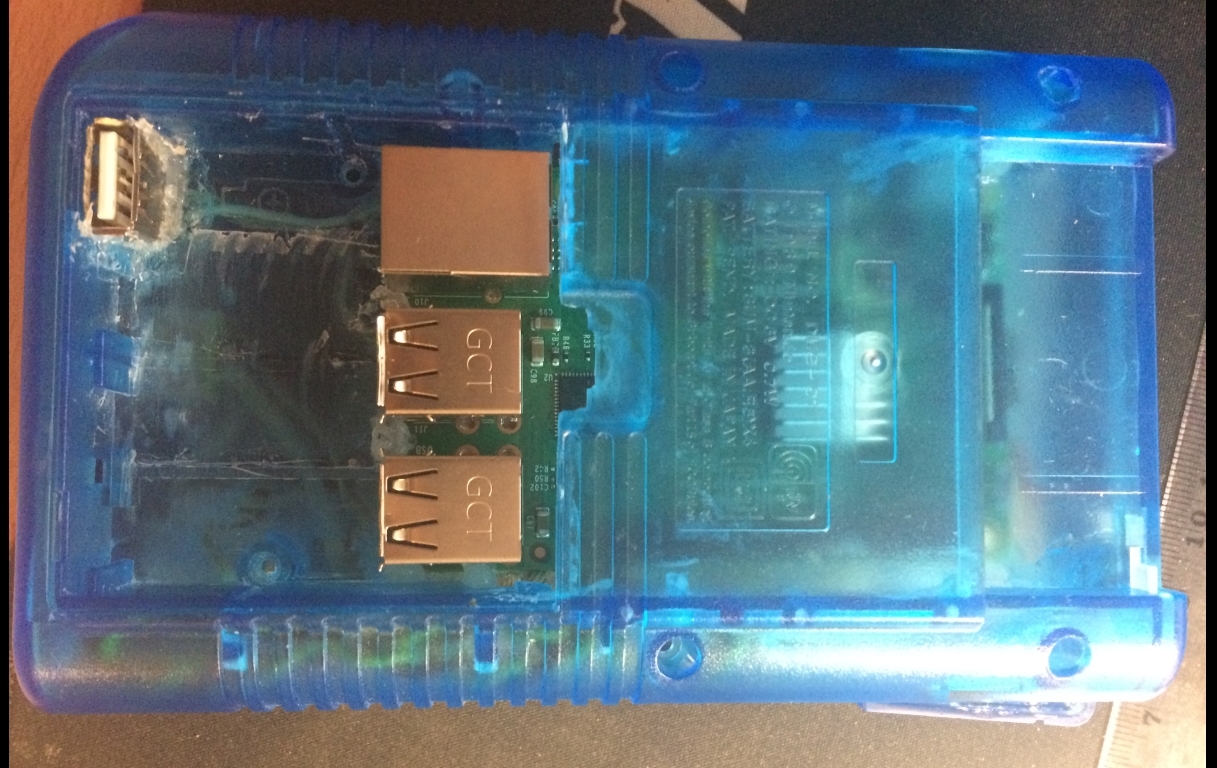
Yes I do notice that a big usb might not be able to fit, but that wasn't the point. I was attempting to make this easier for a nooby in order to not cut up a pi 3 which is kinda expensive if a novice were to break it! In this version I have attempted to make it as simple as possible for a novice to copy (apart from cutting the gameboy case :oops: ). What I intend to do is route 2 usb ports to the original ports on the GB itself. This leaves 2 ports free for a extension cable if need be for 4 player support, etc. Remember it has Wifi and BT, you don't need no stinking dongle!


Thanks all for reading!
JujuPi

User avatar
JujuPi
Posts: 51
Joined: Mon Nov 21, 2016 2:08 am
Has thanked: 8 times
Been thanked: 16 times

Re: JujuPi Build - Pi 3 version (IN PROGRESS)

Post by JujuPi » Thu Jan 12, 2017 9:06 am

Guess what people! I am gonna involve you in my build. I have an idea of incorporating a laptop fan into the cart slot to cool down the CPU. This is possible with a very slim laptop fan with all its metal shrouding. This would be programmed by the Pi and only turn on when it say hits 60ish or a comfortable temperature for our hands...

Ideas?

User avatar
DoggieWokkie
Posts: 27
Joined: Thu Sep 29, 2016 9:41 am
Has thanked: 38 times
Been thanked: 4 times

Re: JujuPi Build - Pi 3 version (IN PROGRESS)

Post by DoggieWokkie » Thu Jan 12, 2017 9:51 am

Following this, I'd love to see the cooling method you come up with.

User avatar
ShadowFax
Posts: 33
Joined: Tue Aug 30, 2016 6:56 pm
Has thanked: 25 times
Been thanked: 6 times

Re: JujuPi Build - Pi 3 version (IN PROGRESS)

Post by ShadowFax » Thu Jan 12, 2017 3:30 pm

Cool! Simpler build makes it easier.
Do you reckon the gel tape will hold the screen firmly?

Cheers from the down under. ;)

User avatar
JujuPi
Posts: 51
Joined: Mon Nov 21, 2016 2:08 am
Has thanked: 8 times
Been thanked: 16 times

Re: JujuPi Build - Pi 3 version (IN PROGRESS)

Post by JujuPi » Fri Jan 13, 2017 5:55 am

ShadowFax wrote:Cool! Simpler build makes it easier.
Do you reckon the gel tape will hold the screen firmly?

Cheers from the down under. ;)
Hello from down under ;)

Yes the gel tape is quite strong. It was used to tape the old iPhone 3GS and lower screens to the edges. It is actually has a perfect hold and is quite similar adhesive used to glue the screen protectors. I used 1 layer for each side of the screen, plus another on the bottom edge. I will post a clearer photo of the adhesive and screen portion for you! The tape is 2 mm wide which is perfect size for this application! The reason why the tape adheres so well to this surface is because:

1. You kind of sand the corners a bit during the cutting process of the screen area.
2. I assume the plastic loves acrylic so to say because it bonds so well to the surface. It is also removable without removing hot glue in comparison which is so hard and is a nightmare! It is removable with a somewhat minimal tug!

Image

Image

The good thing about it is it allows you to move the screen just a tiny bit to make adjustments. When you leave it for a while it won't move much at all and you don't have to bother with the hot glue look which looks yuck when trying to show other people of your creation!

Please excuse the screen protector. I am going to purchase one from retrorfresh or someone who can provide me a custom one when I am done completely to avoid any scratches! :cry:

User avatar
JujuPi
Posts: 51
Joined: Mon Nov 21, 2016 2:08 am
Has thanked: 8 times
Been thanked: 16 times

Re: JujuPi Build - Pi 3 version (IN PROGRESS)

Post by JujuPi » Mon Jan 30, 2017 8:48 pm

################### UPDATE 2 ###################

Hey guys, It has been a busy year. So far I have done the following to my GBZ. I am showing what it would look like if a novice wanted to put a Pi 3 into a case and run it off a portable power bank! I am still thinking of fitting a battery but there is some issues with spacing. I think I can incorporate one but it may have to be limited to 70mm L, 55-60 mm W, 5-6 mm D.

NOVICE VERSION - As you can tell I have allowed the Pi3 to remain untouched (apart from me removing the audio port because I chose too). You can seriously fit the Pi in there without any issues! The only problem is that you won't be able to access the USB ports on the backside. That is ok though because you will be soldering USB ports in different places (1 for the side where the contrast port is, 1 on the inside of the battery bay, another if needed on the multiplayer port). You need to use one of the usb ports for the controller board which uses the Pro Micro to drive the controller. The other two I used was for the USB ports.

Note that I used a key board and a usb to test current usage, I averaged 800 MA on full gaming load. So it seems good if you run it off a 1A port, just make sure you have a fast charge cable. Cheaper micro usb cables cannot carry that much current and thus fail to provide a proper voltage. Don't forget you always get voltage drop!

(Please excuse the mess of wire in my build at the moment. You could say I was only demonstrating how the Pi could be placed in. However it does fit together :P. I will tidy them up and then take some final pictures. I am also waiting for the securing bracket to be 3D printed.)

Besides that it is perfect if you don't want to wreck the Pi 3 and you want to remove it later...

Image

Image

Image

Image

ADVANCED VERSION - I intend to desolder the USB ports and ethernet so I can fit a larger battery and some other options. This will be coming up soon.

User avatar
JujuPi
Posts: 51
Joined: Mon Nov 21, 2016 2:08 am
Has thanked: 8 times
Been thanked: 16 times

Re: JujuPi Build - Pi 3 version (IN PROGRESS)

Post by JujuPi » Wed Feb 01, 2017 11:07 pm

Looks like I broke my Pi 3 by desoldering the ports using a professional Hakko solder sucker...

It was working for a while and then I think the LAN IC chip which provides data to the USB and Network ports died due to shorting. Even though I checked it and gave it a wipe with alcohol. It goes to show even if you are a pro at what you do that you always make mistakes - The point is to learn from them and then teach others.

Control your heat on your iron, don't use it for too long on the Pi. Also use an antistatic strap just in case, I think that's how mine died after 2 hours. RLOD like Sotasystems - Sadly.

Post Reply

Who is online

Users browsing this forum: No registered users and 1 guest