
Styrene sheets come in different thicknesses. I'm using 1mm thick and so far it's holding well. The 1mm thick styrene is slightly more bendable than a typical credit card plastic.Camble wrote:Looking tidy chiz! How well would you say the styrene bracket holds? I'm considering "borrowing" your idea.
chiz's GB Pi2
Re: chiz's GB Pi2
Re: chiz's GB Pi2
Hi chriz. I'm really like the ideas of using rp2 for my gb project.
One thing that would be a deciding point for me is the capable of running ps1 game that I absolutely love: Tearing saga and super robot wars.
I searched on the internet but seems like no one with a pi 2 run those games.
Can you do me a favor and test those game for me to see if they can run smoothly on a pi 2 ?
Thank you in advance.
-
Retrohead95
- Posts: 80
- Joined: Thu May 05, 2016 6:00 pm
- Has thanked: 3 times
- Been thanked: 4 times
Re: chiz's GB Pi2
At this point the pi 2 is your only option because the pi 3 overheats and consumes too much power. Even if it didn't run on the pi 2, there are no other alternatives at the moment that I'm aware of. So unfortunately we're stuck with the pi 2 for now.dboSS wrote:Hi chriz. I'm really like the ideas of using rp2 for my gb project.
One thing that would be a deciding point for me is the capable of running ps1 game that I absolutely love: Tearing saga and super robot wars.
I searched on the internet but seems like no one with a pi 2 run those games.
Can you do me a favor and test those game for me to see if they can run smoothly on a pi 2 ?
Thank you in advance.
Re: chiz's GB Pi2
I agree regarding the RPi3 and it's also one of the reasons why I settled for a RPi2. Still I'm considering the RPi3 for another build and not for the GB. Perhaps a build with a larger housing with some heat sinks and fan cooling.dboSS wrote:Hi chriz. I'm really like the ideas of using rp2 for my gb project.
One thing that would be a deciding point for me is the capable of running ps1 game that I absolutely love: Tearing saga and super robot wars.
I searched on the internet but seems like no one with a pi 2 run those games.
Can you do me a favor and test those game for me to see if they can run smoothly on a pi 2 ?
Thank you in advance.
No promises though if I can test Tearing Saga and Super Robot Wars on the Pi2 as I don't have those games.
Re: chiz's GB Pi2
Update #13
Installing the L & R Rubber Pads
Managed to work on the build tonight to have the L & R button rubber pads installed. The mounting plate solution is holding up well to the task! Here's a picture below and a short video showing the L & R buttons in action -- proof that adding working shoulder buttons on the back of the GBA is feasible.
video:
Youtube video showing the shoulder buttons in action!
Installing the L & R Rubber Pads
Managed to work on the build tonight to have the L & R button rubber pads installed. The mounting plate solution is holding up well to the task!
video:
Youtube video showing the shoulder buttons in action!
Last edited by chiz on Fri May 20, 2016 11:22 am, edited 2 times in total.
-
Retrohead95
- Posts: 80
- Joined: Thu May 05, 2016 6:00 pm
- Has thanked: 3 times
- Been thanked: 4 times
Re: chiz's GB Pi2
Awesome. I love how you positioned the Pi. Makes it easier to add an hdmi extension to be mounted to the side. Also Where'd you get the styrene sheets? I take it that https://www.amazon.com/gp/product/B000B ... 5GG01HBOZ1 is the same?chiz wrote:Update #13
Installing the L & R Rubber Pads
Managed to work on the build tonight to have the L & R button rubber pads installed. The mounting plate solution is holding up well to the task!
2016-05-13 22.24.59 copy.jpg
video:
Youtube video showing the shoulder buttons in action!
-
grenade44
- Posts: 169
- Joined: Wed May 04, 2016 11:58 pm
- Location: Whitehill, UK
- Has thanked: 17 times
- Been thanked: 28 times
- Contact:
Re: chiz's GB Pi2
Those back buttons look great. I'm not sure what I'm going to do yet.chiz wrote:Update #13
Installing the L & R Rubber Pads
Managed to work on the build tonight to have the L & R button rubber pads installed. The mounting plate solution is holding up well to the task!
2016-05-13 22.24.59 copy.jpg
video:
Youtube video showing the shoulder buttons in action!
How are you adding the volume wheel to control the volume of the audio?
-
Kilren

- Posts: 574
- Joined: Wed May 11, 2016 4:40 pm
- Location: Washington, USA
- Has thanked: 35 times
- Been thanked: 84 times
Re: chiz's GB Pi2
For those bumpers, did you use a spring at all or is it just the silicone button pads? I'm loving the idea and might do the same. I'm sort of torn yet.grenade44 wrote:chiz wrote:Update #13
Installing the L & R Rubber Pads
Managed to work on the build tonight to have the L & R button rubber pads installed. The mounting plate solution is holding up well to the task!
2016-05-13 22.24.59 copy.jpg
video:
Youtube video showing the shoulder buttons in action!
Re: chiz's GB Pi2
@Retrohead95
Yes they're the same styrene sheets but I prefer the white variant over the gray/black one because it would be difficult to see pencil marks on the darker variants. I'm primarily using the .040" (1.02 mm) thickness in my build so far.
@grenade44
I will be soldering a disc potentiometer to a PCB and will mount the PCB to the GB shell using epoxy.
@Kilren
No springs. It's just the rubber/silicone button pads. The shoulder buttons have the same feel as when they were originally in the knock-off USB controller housing.
Re: chiz's GB Pi2
Update #14
Making the Cartridge Bay Cover
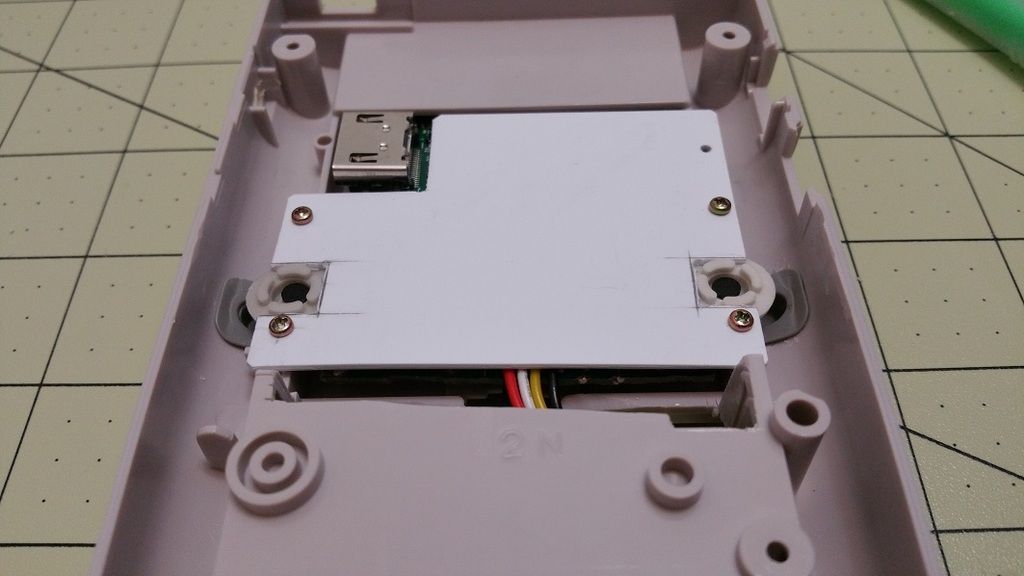
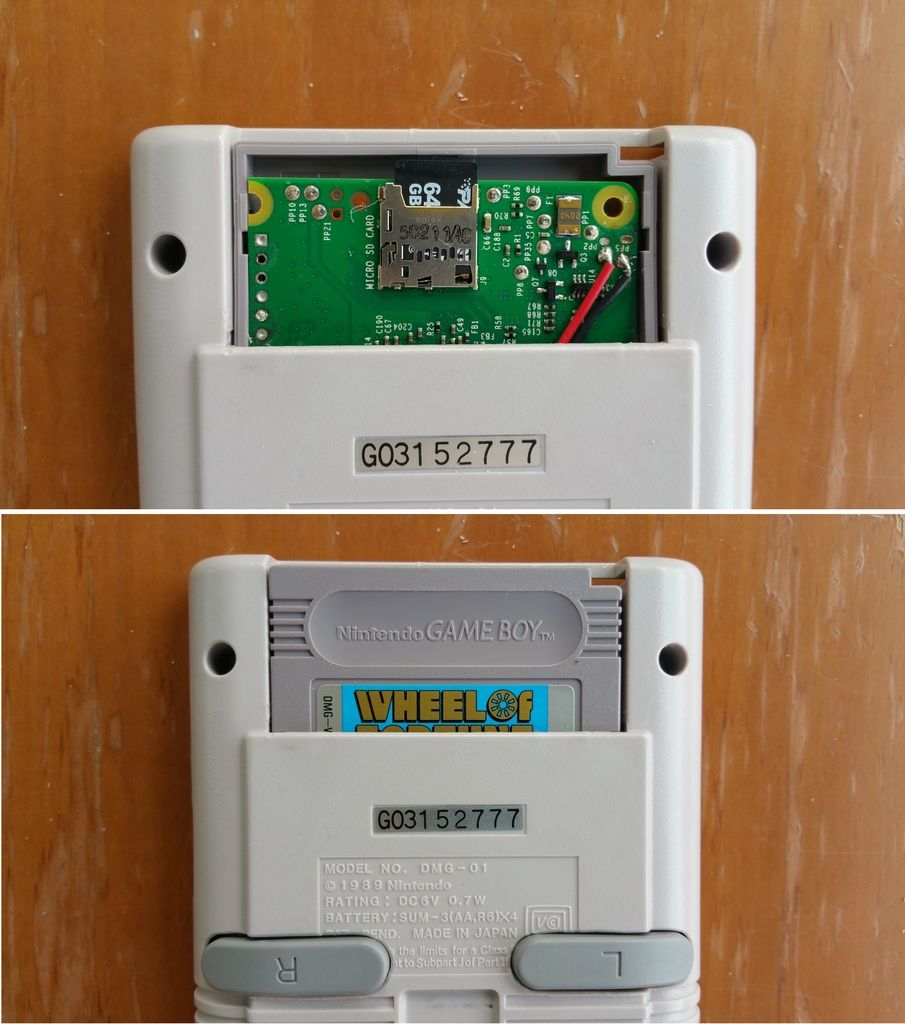
I've cut the cartridge this morning for use as cover for the cartridge bay. Recall that going the RPi2 route rather than the Pi Zero, I had to sacrifice the removable cartridge feature of Wermy's original GBZ design.
Orienting the RPi2 to be placed in the cartridge bay will make RPi2's SD card slot accessible but exposes the whole board too. My solution is use a game cartridge to cover the bay but still make it removable so I can still easily change SD cards.
Here's how I cut the cart:
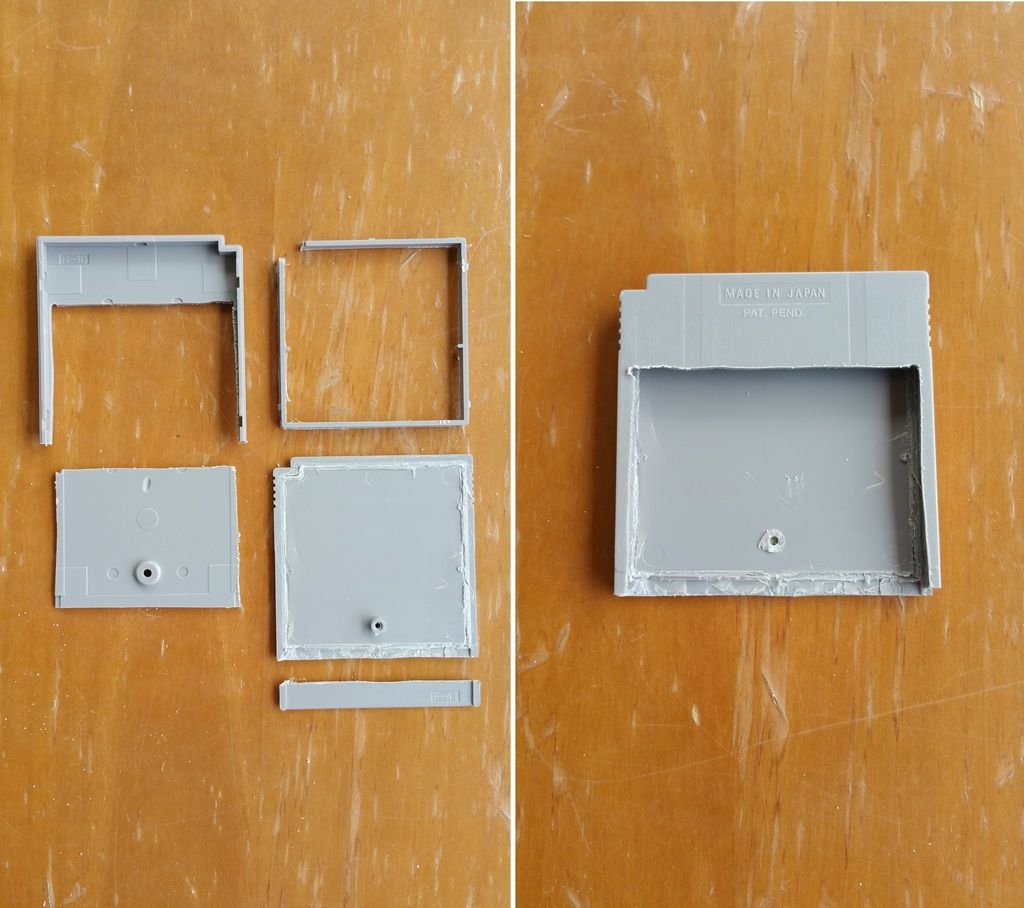
And here's how the cart will cover the RPI2:
Making the Cartridge Bay Cover
I've cut the cartridge this morning for use as cover for the cartridge bay. Recall that going the RPi2 route rather than the Pi Zero, I had to sacrifice the removable cartridge feature of Wermy's original GBZ design.
Orienting the RPi2 to be placed in the cartridge bay will make RPi2's SD card slot accessible but exposes the whole board too. My solution is use a game cartridge to cover the bay but still make it removable so I can still easily change SD cards.
Here's how I cut the cart:
And here's how the cart will cover the RPI2:
Who is online
Users browsing this forum: No registered users and 1 guest