I plan on doing my L and R buttons tomorrow. How did you measure the area to cut the L and R buttons?chiz wrote:Update #14
Making the Cartridge Bay Cover
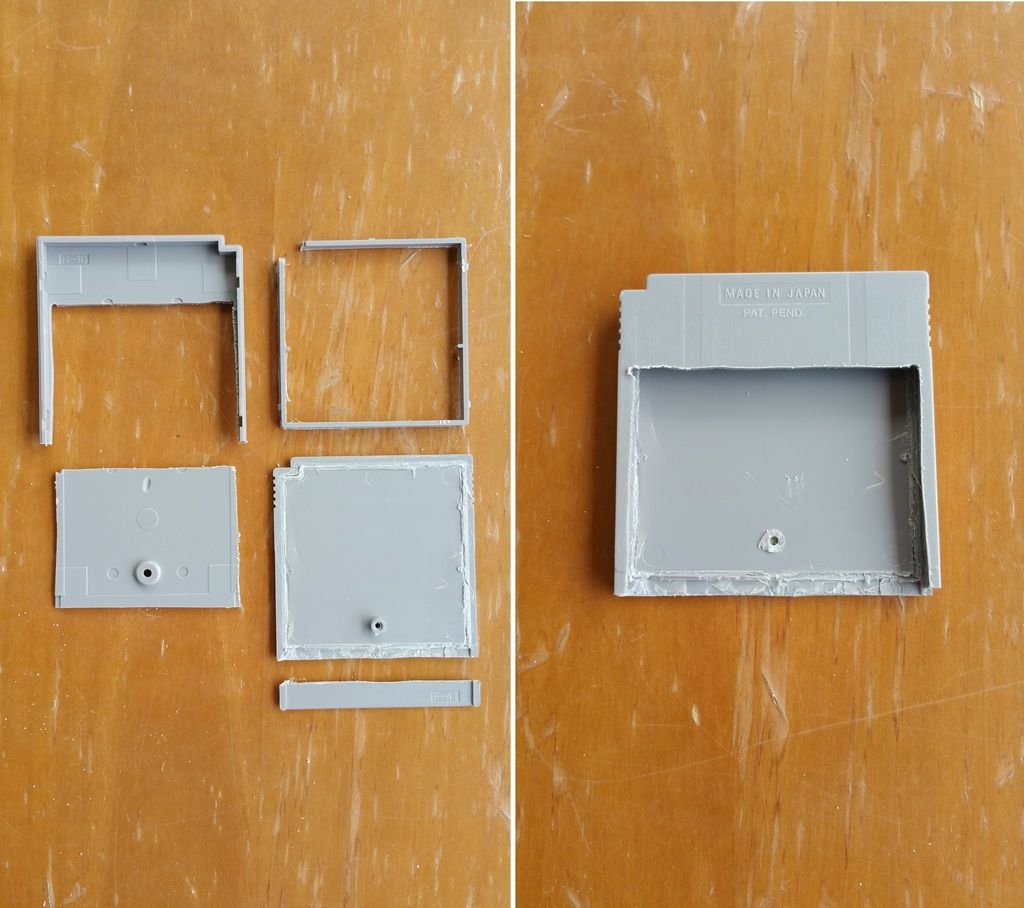
I've cut the cartridge this morning for use as cover for the cartridge bay. Recall that going the RPi2 route rather than the Pi Zero, I had to sacrifice the removable cartridge feature of Wermy's original GBZ design.
Orienting the RPi2 to be placed in the cartridge bay will make RPi2's SD card slot accessible but exposes the whole board too. My solution is use a game cartridge to cover the bay but still make it removable so I can still easily change SD cards.
Here's how I cut the cart:
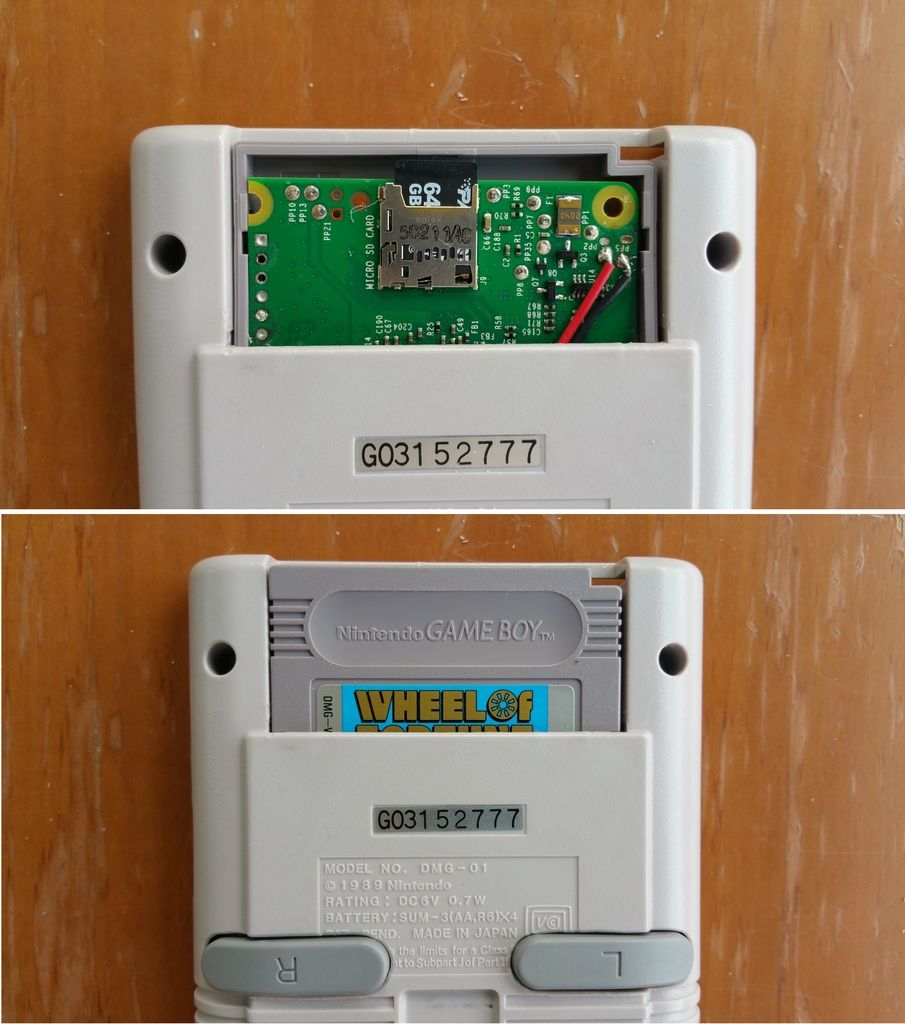
And here's how the cart will cover the RPI2:
chiz's GB Pi2
-
Retrohead95
- Posts: 80
- Joined: Thu May 05, 2016 6:00 pm
- Has thanked: 3 times
- Been thanked: 4 times
Re: chiz's GB Pi2

Re: chiz's GB Pi2
@Retrohead95
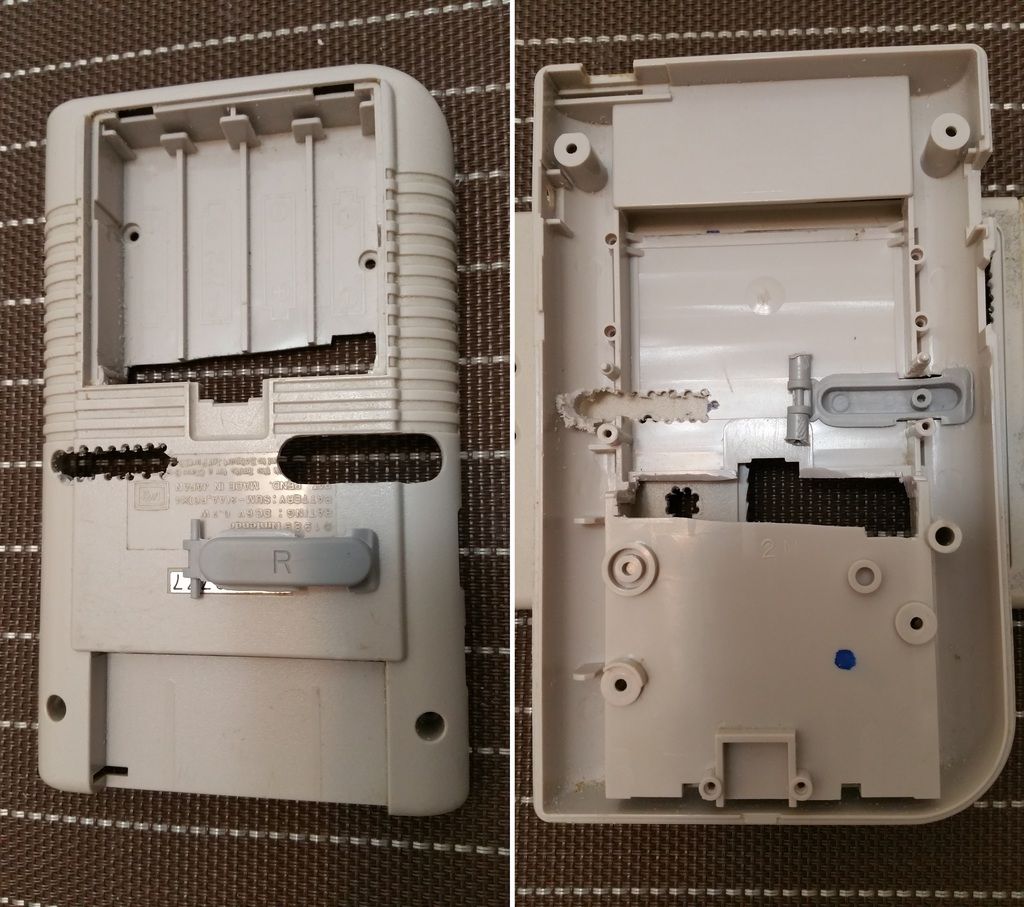
I used the shoulder button hole of the knock-off controller to make a template out of card stock and used it mark the back of the GB shell ensuring that the edge of of the buttons are placed exactly where the original middle side screw holes are. See this pic below. Notice the pencil marks?
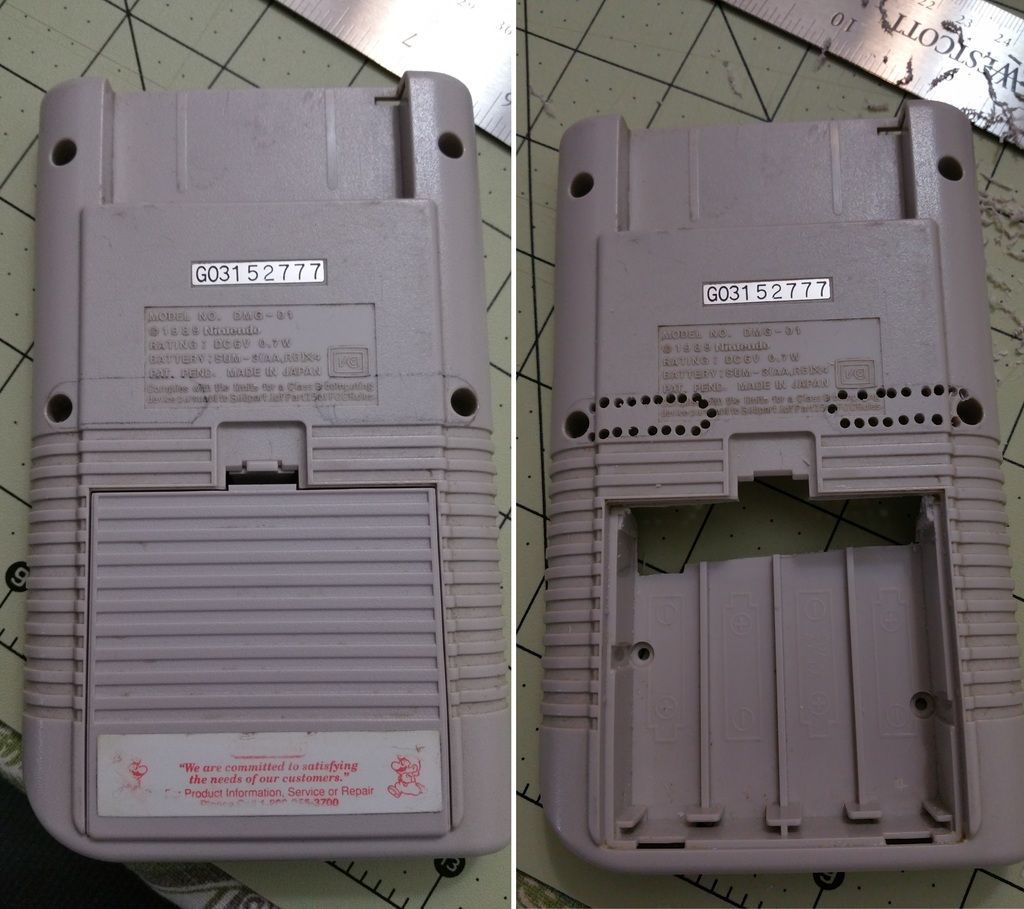
Then I proceed with my cutting technique of using a pin vise to cut holes around the outline then saw the shell using a jeweler's saw.
Then I slowly make the holes bigger by sanding using needle files until the hole is big enough that the buttons will go through and with ample clearance so it wont scratch along the edges of the holes.
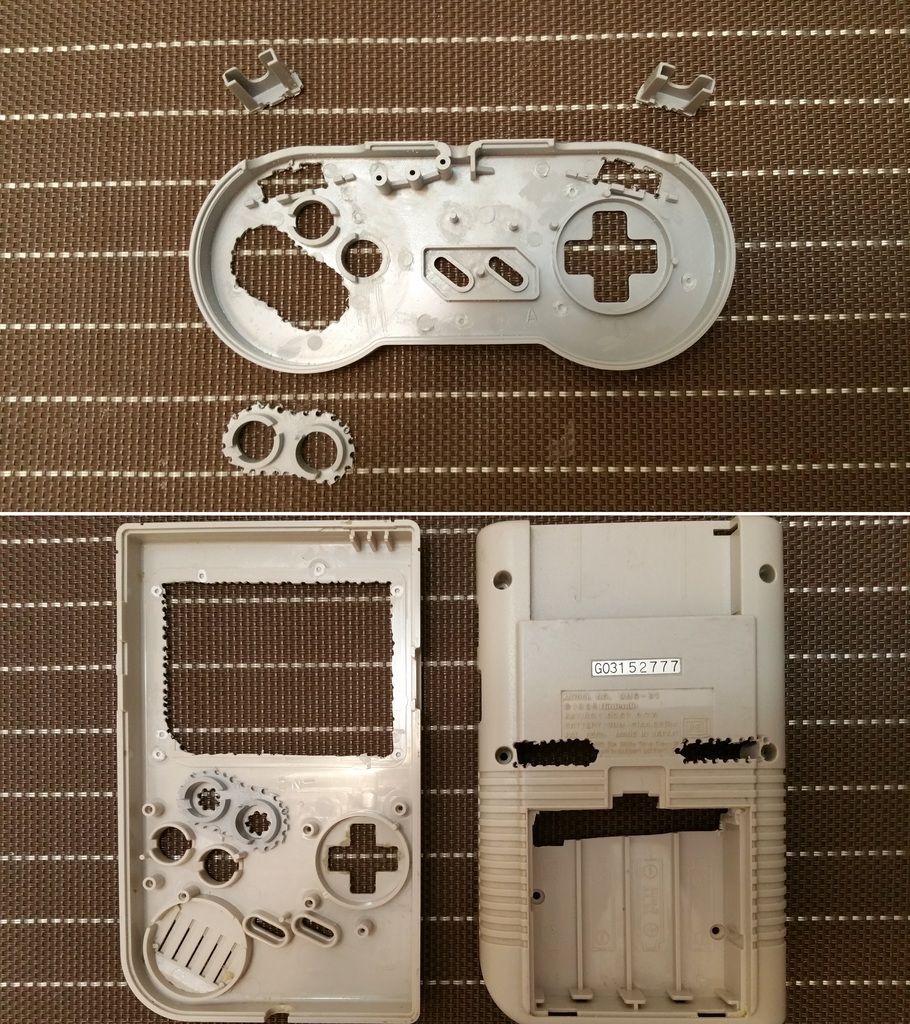
Eventually achieving this:
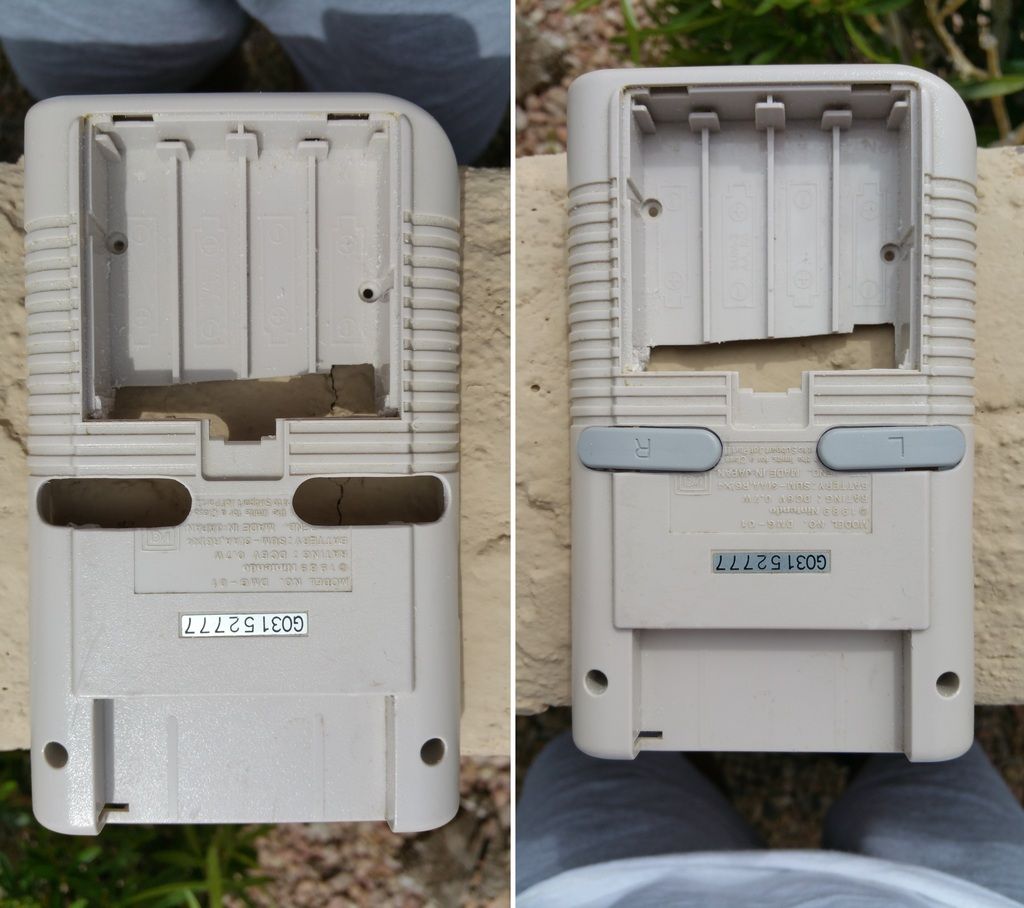
I used the shoulder button hole of the knock-off controller to make a template out of card stock and used it mark the back of the GB shell ensuring that the edge of of the buttons are placed exactly where the original middle side screw holes are. See this pic below. Notice the pencil marks?
Then I proceed with my cutting technique of using a pin vise to cut holes around the outline then saw the shell using a jeweler's saw.
Then I slowly make the holes bigger by sanding using needle files until the hole is big enough that the buttons will go through and with ample clearance so it wont scratch along the edges of the holes.
Eventually achieving this:
-
Retrohead95
- Posts: 80
- Joined: Thu May 05, 2016 6:00 pm
- Has thanked: 3 times
- Been thanked: 4 times
Re: chiz's GB Pi2
Sorry. I didn't know you already posted it. I scrolled through this thread a few times a day but never saw that first picture. Thanks again. Also thanks for documenting your process, it really helps.chiz wrote:@Retrohead95
I used the shoulder button hole of the knock-off controller to make a template out of card stock and used it mark the back of the GB shell ensuring that the edge of of the buttons are placed exactly where the original middle side screw holes are. See this pic below. Notice the pencil marks?
Then I proceed with my cutting technique of using a pin vise to cut holes around the outline then saw the shell using a jeweler's saw.
Then I slowly make the holes bigger by sanding using needle files until the hole is big enough that the buttons will go through and with ample clearance so it wont scratch along the edges of the holes.
Eventually achieving this:
-
jlane52641

- Posts: 53
- Joined: Fri May 06, 2016 4:00 am
- Location: Southeast Iowa
- Has thanked: 18 times
- Been thanked: 5 times
Re: chiz's GB Pi2
Chiz just wanted to say thanks
Thanks for the great project post
Thanks for the usb DAC idea
And most importantly thanks for the idea to use a pin vise/jewelers saw. It has come in handy for other projects too and if it weren't for you I'd have never known about them and what great tools they are.
Really appreciate your work.
Thanks again!
Re: chiz's GB Pi2
@jlane52641
You are very welcome! Glad you learned a thing or two that you can use in your projects to come.
Like you, if the others didn't share, I might have not learned these tricks too. So, I'm just "paying it forward".
You are very welcome!
Like you, if the others didn't share, I might have not learned these tricks too. So, I'm just "paying it forward".

Re: chiz's GB Pi2
Hi!
I'm doing the mod with a raspberry pi 3. I have only one problem. Because it sits so nicely in the middle of the gameboy I still have a space of about 10-15mm between the HDMI port and the case of the gameboy. Do you have any idea how to connect the HDMI so it is accessible from the outside on the side to be able to connect a cable?
Without drilling a huge hole of course
-
Retrohead95
- Posts: 80
- Joined: Thu May 05, 2016 6:00 pm
- Has thanked: 3 times
- Been thanked: 4 times
Re: chiz's GB Pi2
They sell hdmi extender cables. They're available on Amazon, just type in "hdmi extender cables". You would plug one in the pi and the other end would extend to the side of the case. Also since you're using the pi 3 you'll also have to add a fan and some heat sinks to prevent overheating. You'll also need a more powerful battery and as far as I know the powerboost 1000c doesn't output enough current to charge the pi 3 while playing. Thought it would be worth mentioning before you get too deep in your project.Mad_Duke wrote:Hi!
I'm doing the mod with a raspberry pi 3. I have only one problem. Because it sits so nicely in the middle of the gameboy I still have a space of about 10-15mm between the HDMI port and the case of the gameboy. Do you have any idea how to connect the HDMI so it is accessible from the outside on the side to be able to connect a cable?
Without drilling a huge hole of course

Re: chiz's GB Pi2
We need one of these for the zero build too right? And we would have to break open the rubber casing of the cord so it's more flexible? Extender cables that i know of aren't super long but are long enough where it would have trouble maneuvering to where the zero would be and feels like they wouldn't connect unless we busted the wire out of the casing.Retrohead95 wrote:They sell hdmi extender cables. They're available on Amazon, just type in "hdmi extender cables". You would plug one in the pi and the other end would extend to the side of the case.
I just don't know how [mention]wermy[/mention] gets his mini hdmi out of the contrast port.
-
wermy

- Site Admin
- Posts: 1346
- Joined: Tue May 03, 2016 8:51 pm
- Has thanked: 620 times
- Been thanked: 1322 times
- Contact:
Re: chiz's GB Pi2
I actually just have the pi itself mounted behind the screen controller board, lined up so that the hdmi port and contrast wheel holes align:Ganreizu wrote:We need one of these for the zero build too right? And we would have to break open the rubber casing of the cord so it's more flexible? Extender cables that i know of aren't super long but are long enough where it would have trouble maneuvering to where the zero would be and feels like they wouldn't connect unless we busted the wire out of the casing.Retrohead95 wrote:They sell hdmi extender cables. They're available on Amazon, just type in "hdmi extender cables". You would plug one in the pi and the other end would extend to the side of the case.
I just don't know how [mention]wermy[/mention] gets his mini hdmi out of the contrast port.
http://imgur.com/7v1X4hp


Who is online
Users browsing this forum: No registered users and 1 guest