Page 1 of 2
Jjj's GBZ
Posted: Fri May 06, 2016 11:23 am
by jjj
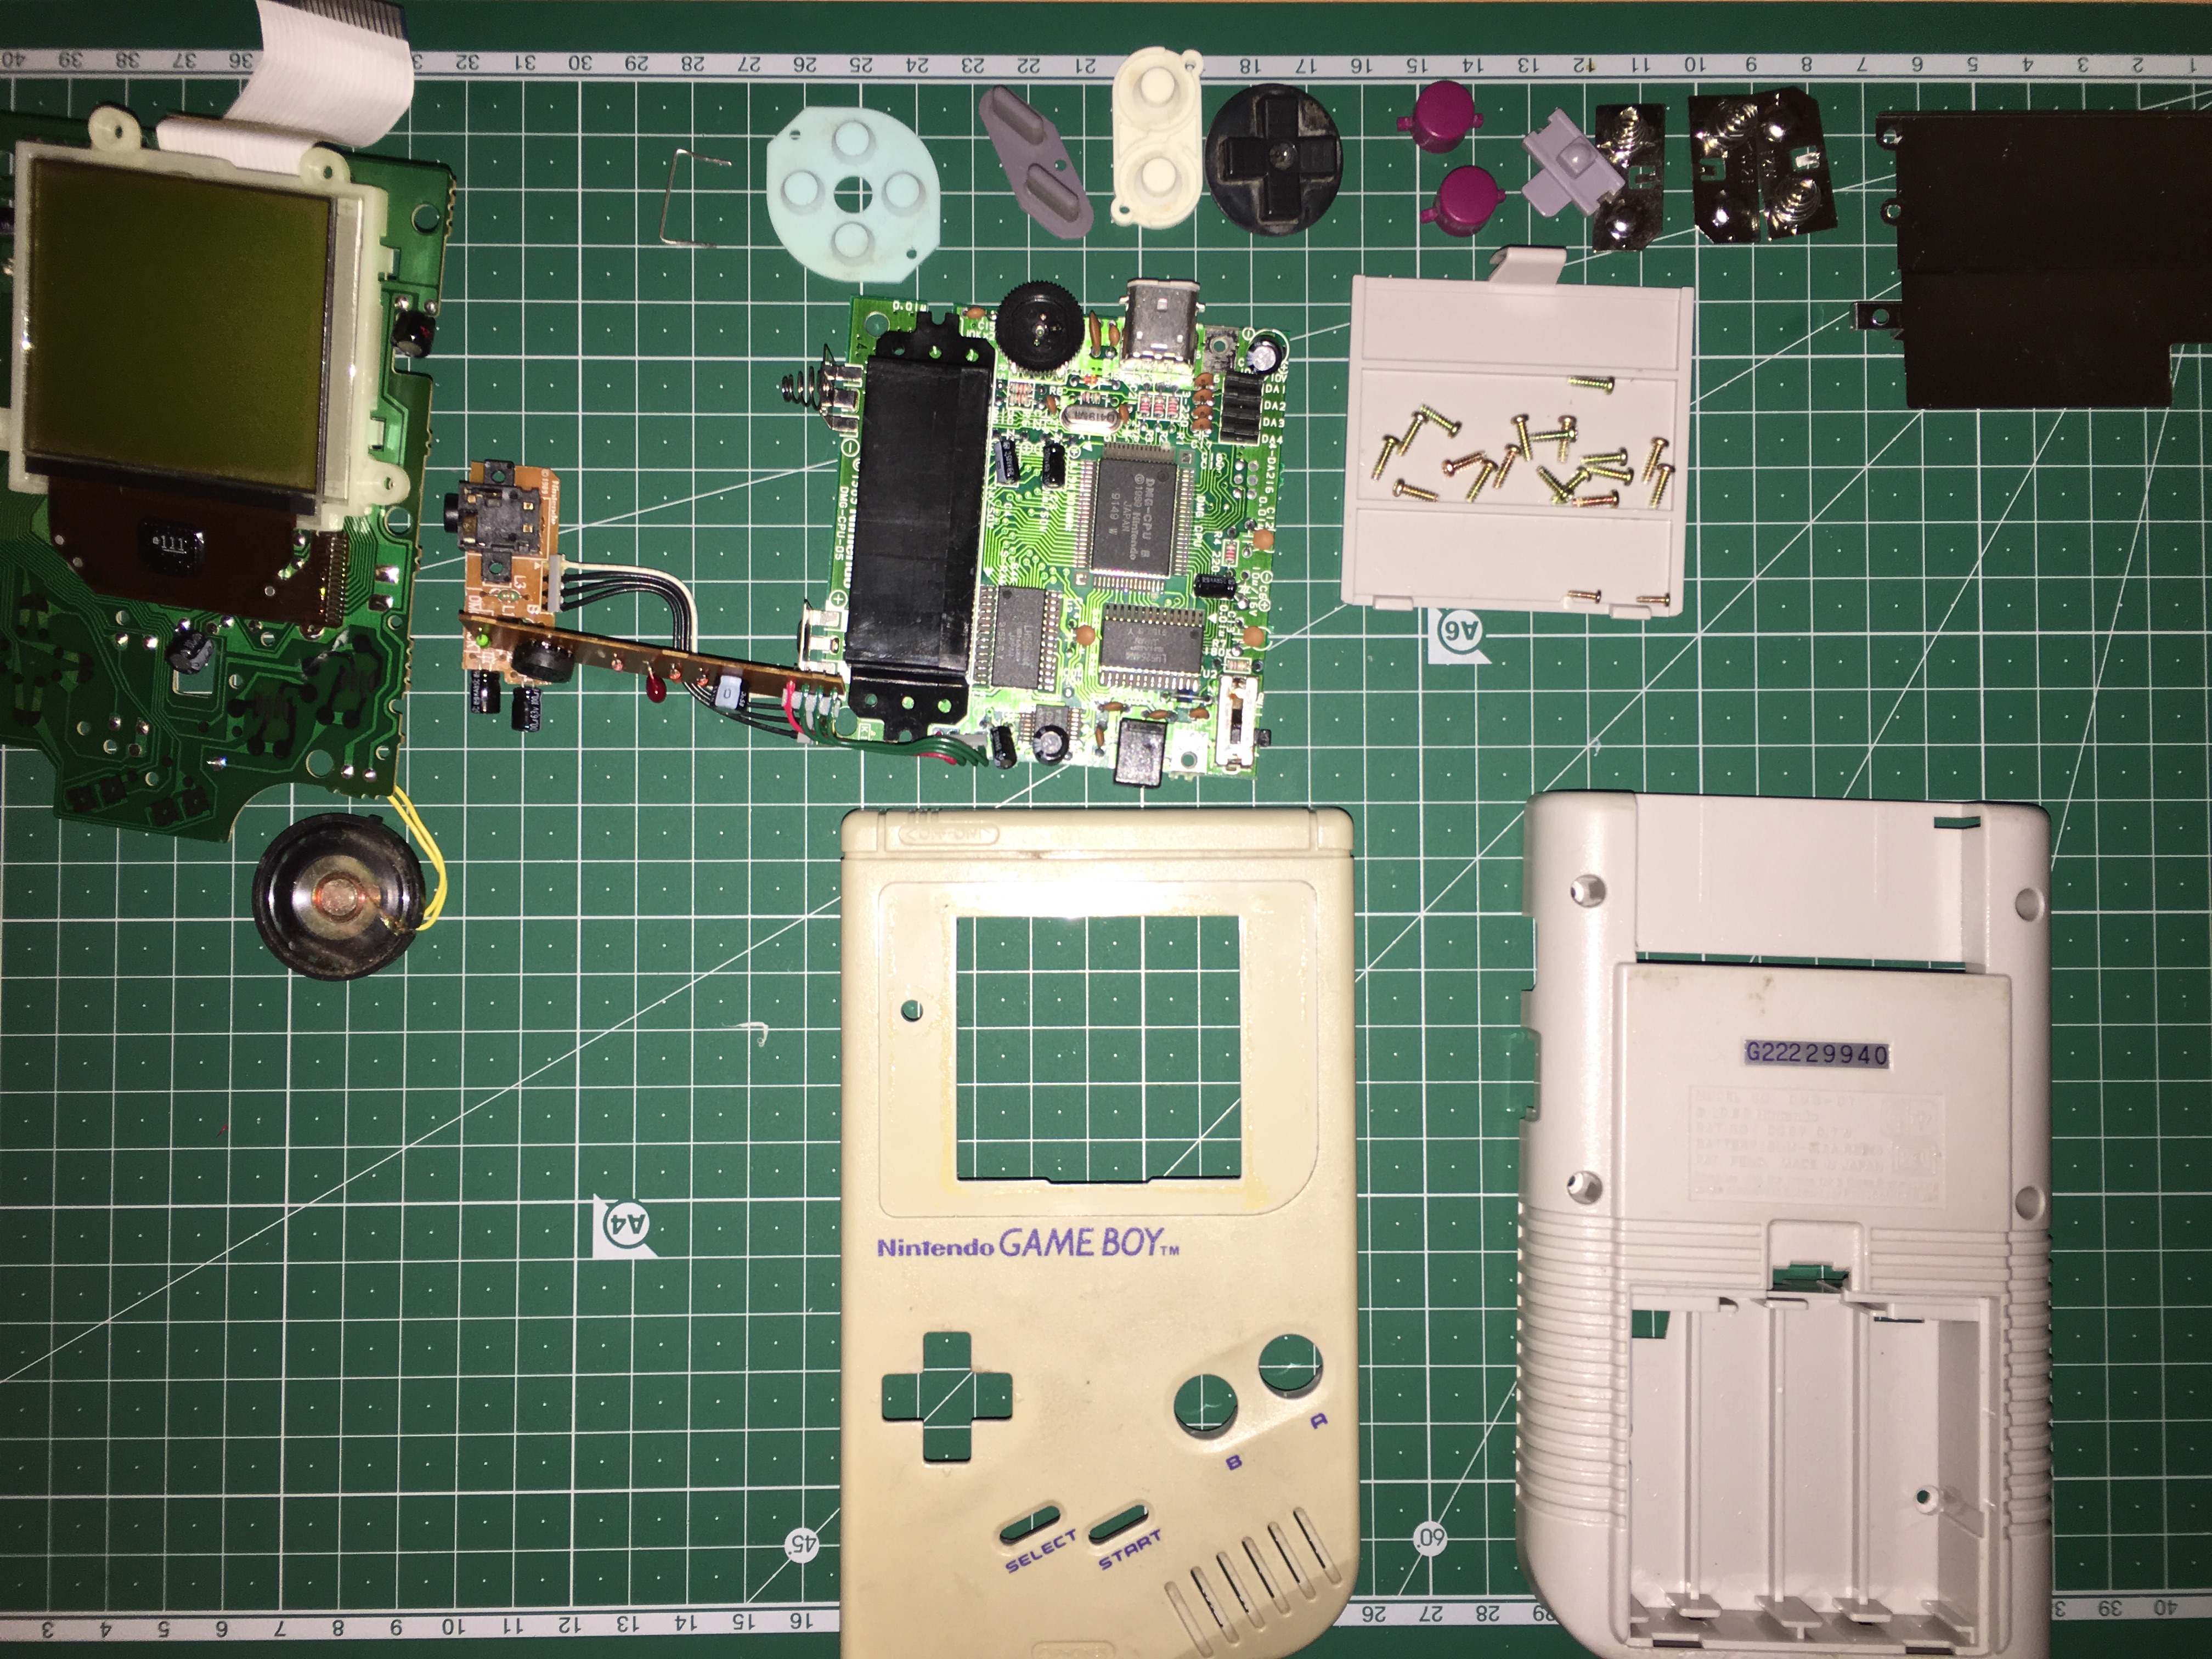
I'm making slow progress as I only just got most of the parts this week, but finally getting started.
So far I've taken apart the gameboy and used peroxide to reverse some of the yellowing on the case.
Before:
- image.jpeg (2.62 MiB) Viewed 60569 times
After:
- image.jpeg (2.26 MiB) Viewed 60569 times
So far I'm reasonably happy with the results. That was just from a few hours in the garden this afternoon. You can tell from the photos that the front of the case is a lot better (that back was pretty good to begin with) but close up there is still a difference between the two.
I also got a chance to practice with the dremel while the case was de-yellowing. Hopefully one more round of peroxide and the front of the case should match the back.
Next steps:
- Case modifications (holes for x/y buttons, remove battery compartment, widen space for display
- Remove gameboy display from pcb, cut pcb down to size
- Solder button traces, add copper tape for x/y buttons and program teensy
Eventually once I've finished this project, I may add some more buttons and an analog stick to play N64 games, if they play well on the pi zero.
Re: Jjj's GBZ
Posted: Fri May 06, 2016 4:45 pm
by HUg0005
Looking good!
I was thinking of adding an analogue stick to mine when I get everything working because the teesy has analogue input so it should work. Just need to find where to put it.
Re: Jjj's GBZ
Posted: Fri May 06, 2016 5:24 pm
by mikespadafora
Awesome man! I was also thinking about adding a joystick and a few more buttons to play N64. If you do, I'm sure many people, including myself, would like to see how you did it! I was also thinking for the C buttons, instead of adding 4 more buttons, just adding a second joystick. I use the right joystick on my xbox 360 usb controller for the C buttons and it works pretty well. Might be easier to find a place for it too! Let me know what you think!
Re: Jjj's GBZ
Posted: Fri May 06, 2016 7:28 pm
by crispy_tofu
Cool! For the whitening of the Game Boy case, did you use only hydrogen peroxide, or the whole retr0bright formula?

Re: Jjj's GBZ
Posted: Fri May 06, 2016 9:28 pm
by razor
Have you guys thought about replacing the d-pad with an analog stick? That way you can just put the analog stick where the dpad is and it'll still look pretty good.
Re: Jjj's GBZ
Posted: Sat May 07, 2016 1:05 am
by jjj
@HUg0005
Thanks, I was thinking of trying to find space for it below the d-pad.
@mikespadafora
I had thought of that, but I realised since the N64 doesn't have x/y buttons, I'd only need to add to more to have a/b and 4 c-buttons. I think it might be easier to find space for 2 buttons than an extra analog stick, especially if I'm already planning to add 1 analog stick.
@crispy_tofu
I just used hydrogen peroxide gel at 40vol/12% (bought it from superdrug for anyone in the UK looking for it). It only came in small 75ml bottles but I only used about half a bottle to cover both parts of the case.
@razor
I hadn't thought of that, maybe I'll consider it. I like the idea of keeping the d-pad for all those retro games that use it though.
Re: Jjj's GBZ
Posted: Tue May 10, 2016 3:00 pm
by jjj
Update:
I put the front of the case back in the sun for another hour or two with peroxide, and it seems to match the rear of the case now.
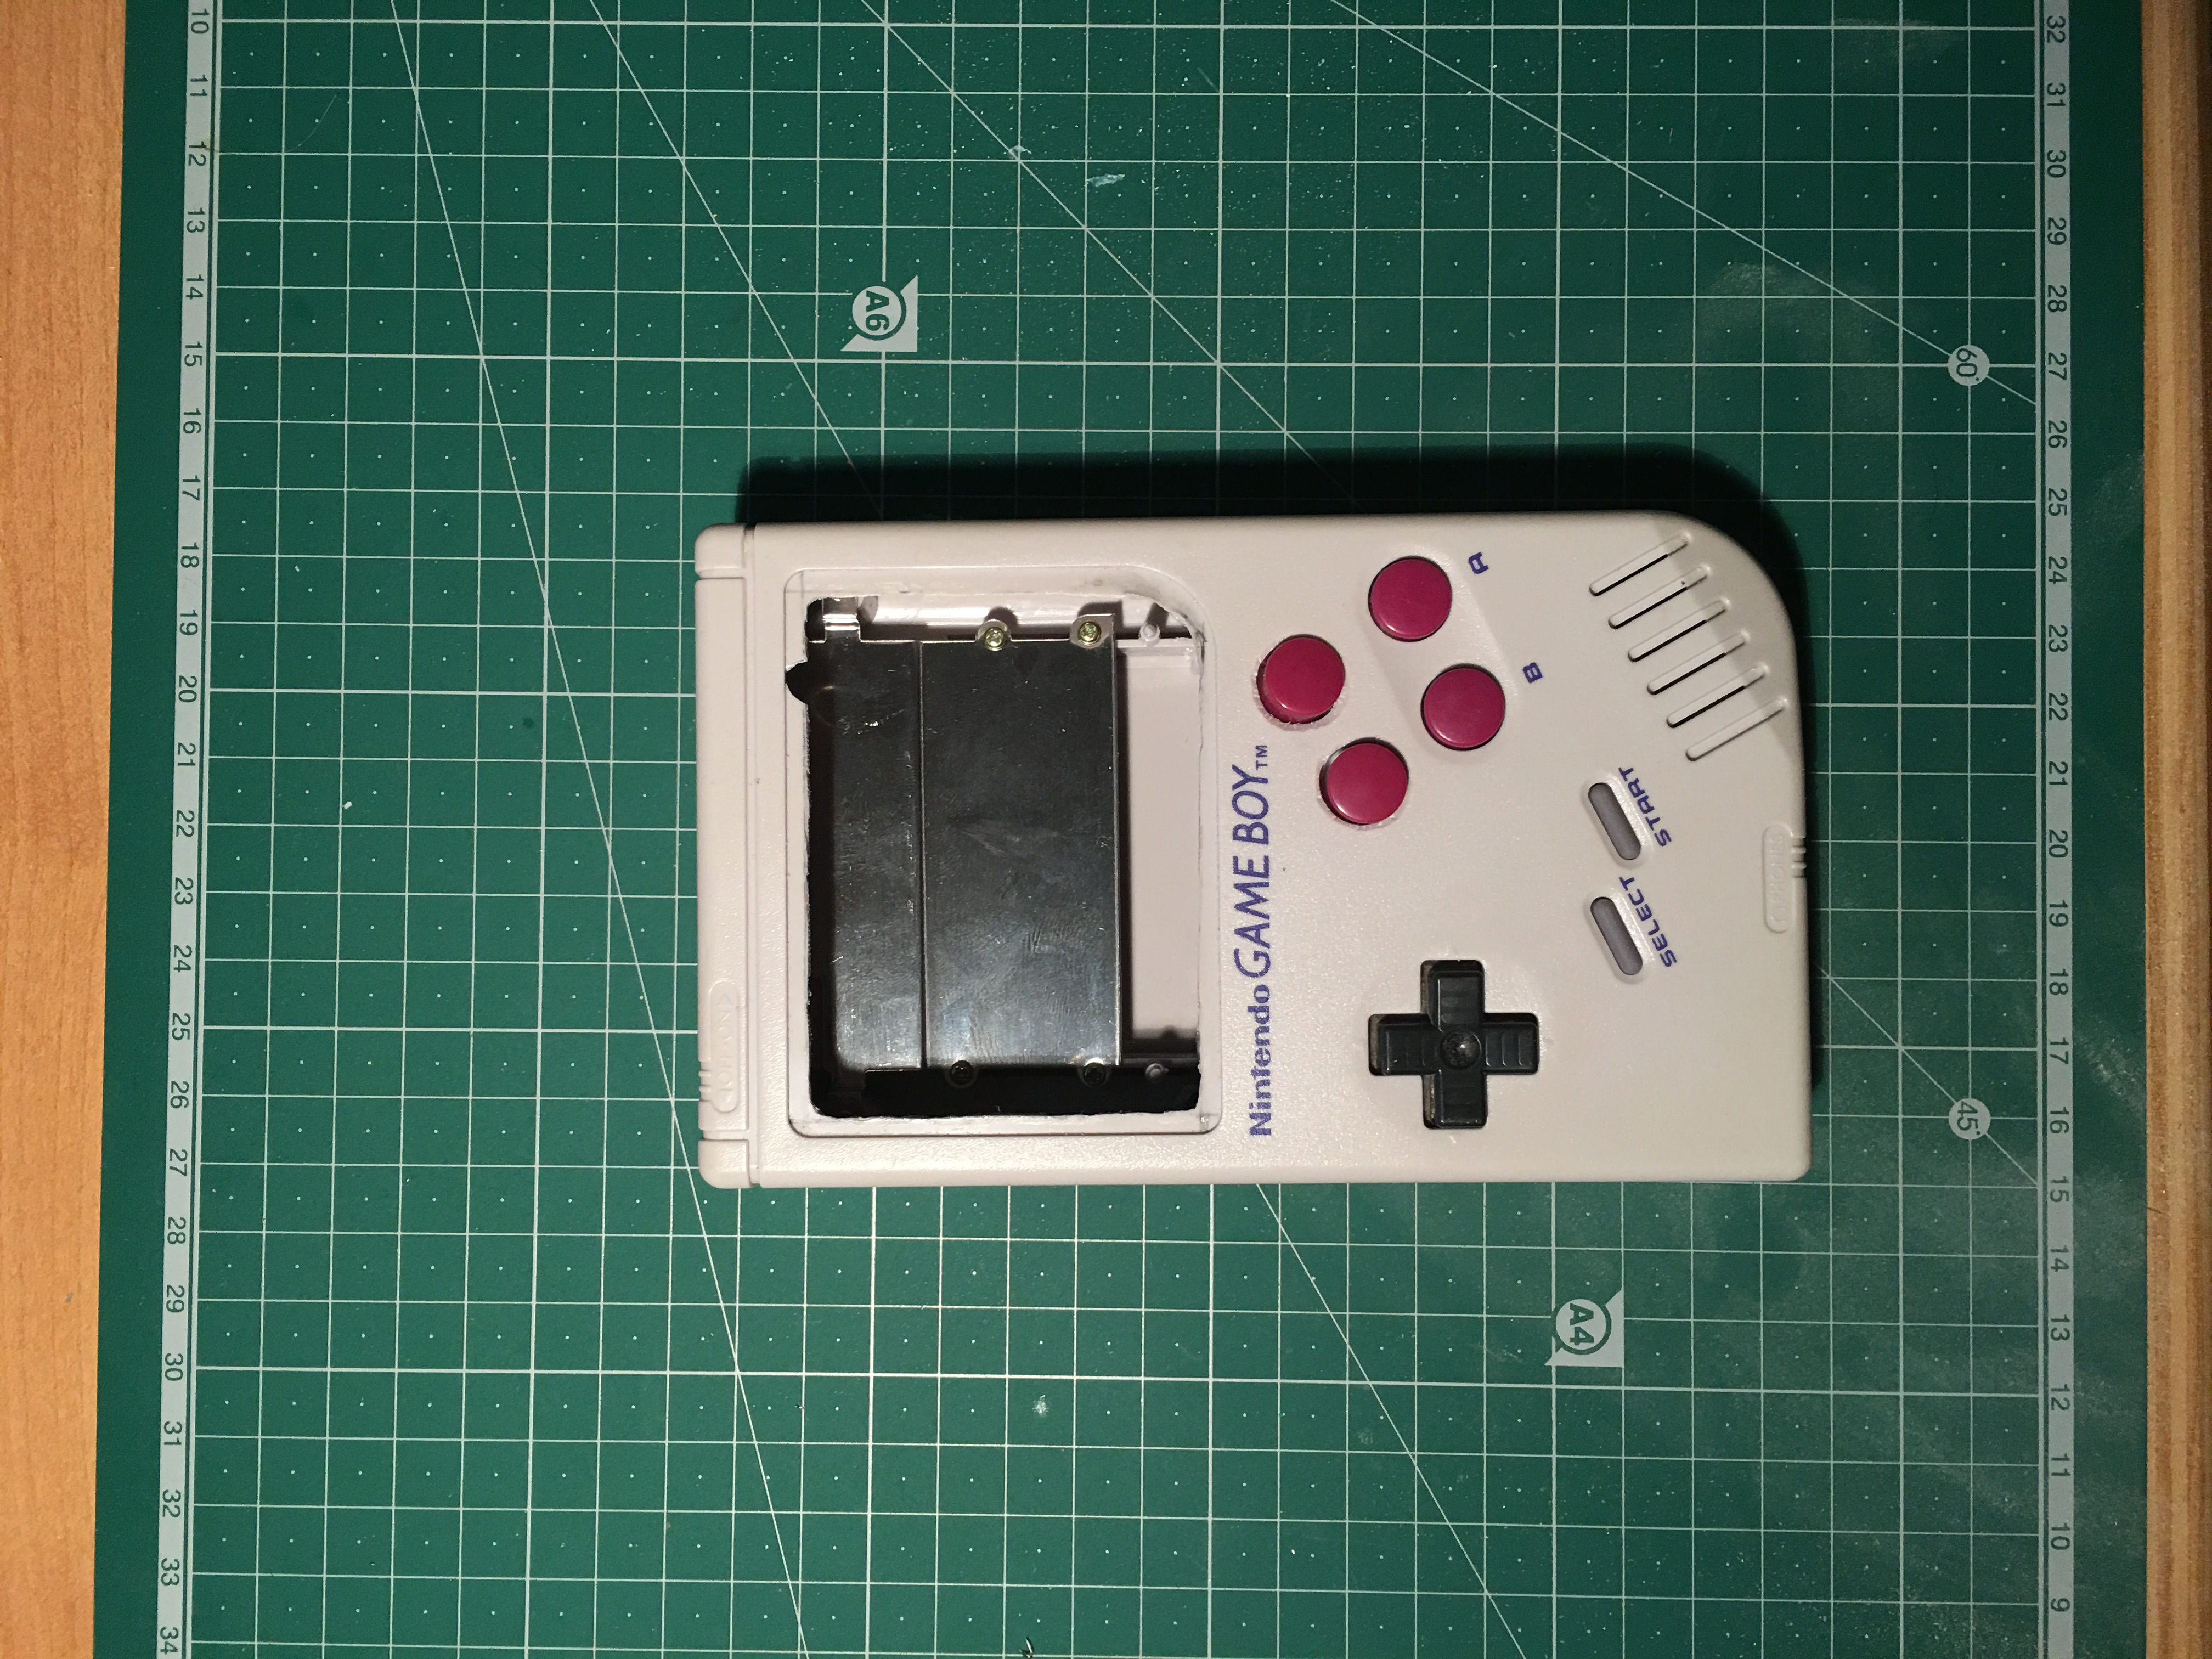
I've now made most of the case modifications - dremelled down the screw posts for l/r buttons, widened holes on the side of the case for USB and micro USB ports, widened space for screen and drilled holes for x/y buttons.
I left a small ledge around the edge of the display area to attach a screen protector - once that arrives I'll file down the edges further to neaten it up.
You can see I made a small mistake with the dremel at the top of the display - I'm hoping I can cover that up, perhaps by painting a black border on the inside of the screen protector.
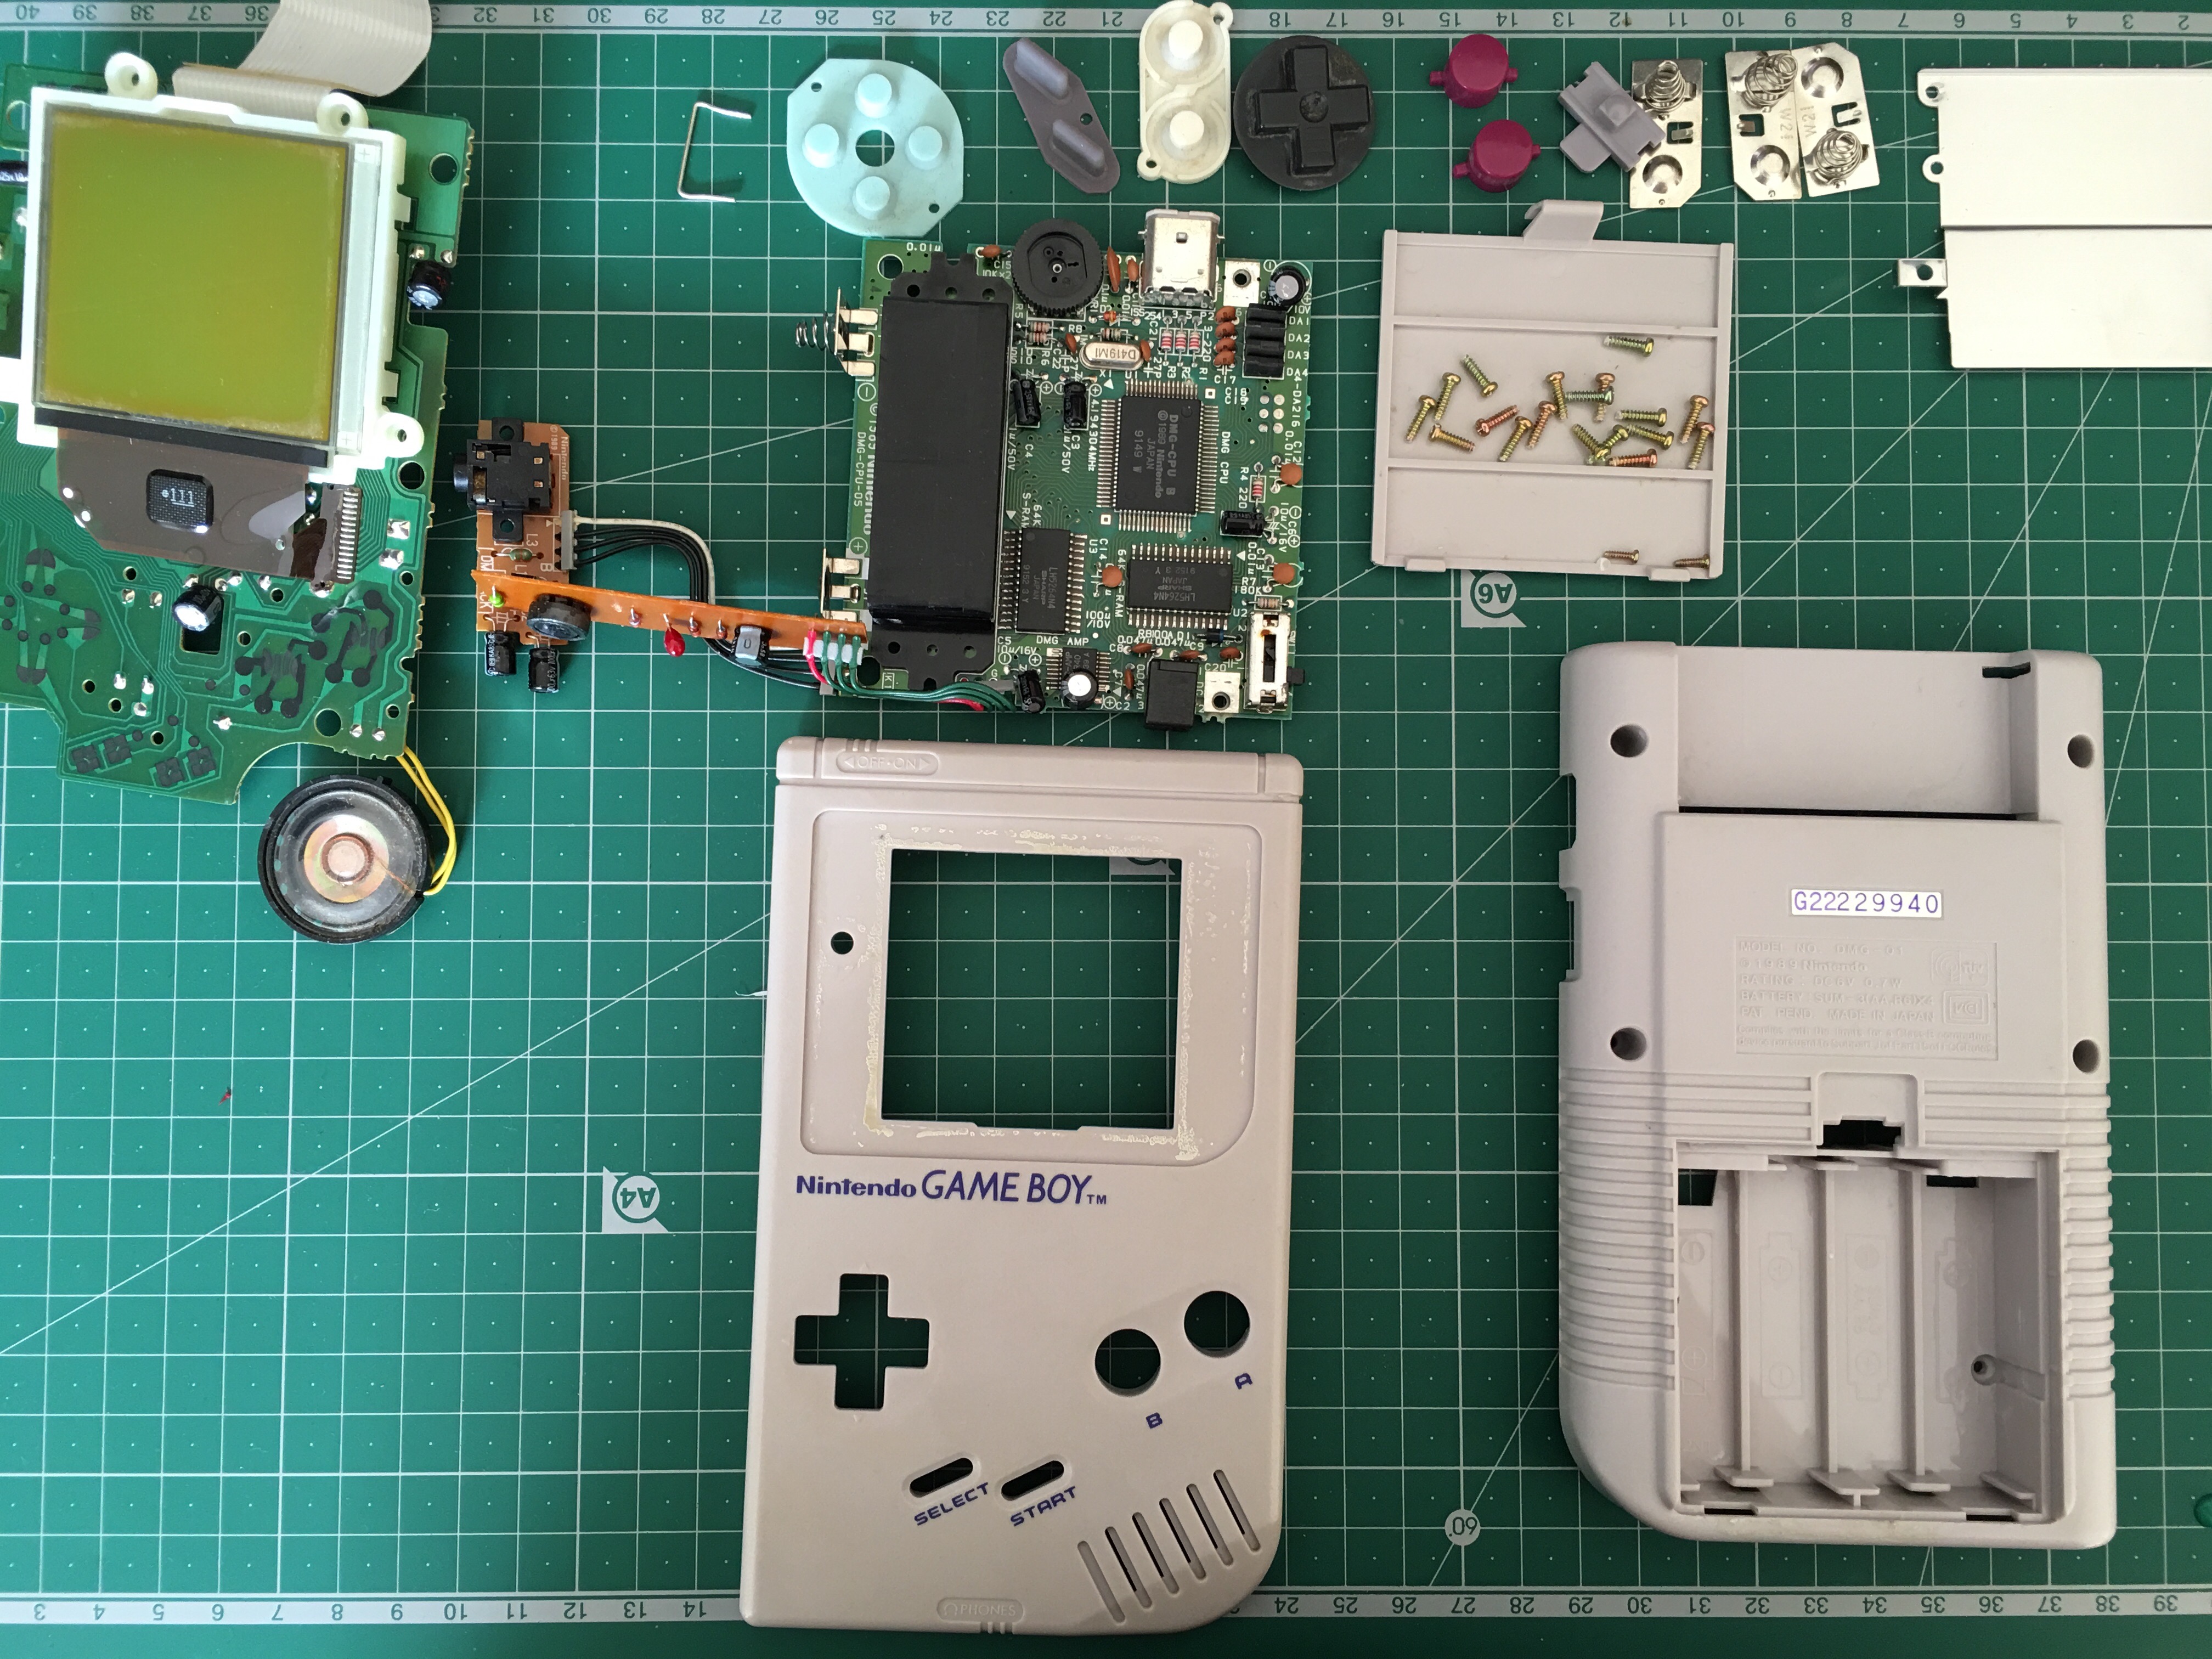
Finally, I removed some components from the pcb and cut it down to size for the buttons. I've temporarily screwed it into the case to see how everything looks.
- image.jpeg (2.56 MiB) Viewed 60427 times
One thing I've noticed is I definitely need button wells for the x/y buttons. I bought a spare set of DMG buttons to use off eBay as I wanted the colour to match but now I have to find button wells from somewhere.
Re: Jjj's GBZ
Posted: Tue May 10, 2016 5:51 pm
by Rod2D2
jjj wrote:Update:
I put the front of the case back in the sun for another hour or two with peroxide, and it seems to match the rear of the case now.
I've now made most of the case modifications - dremelled down the screw posts for l/r buttons, widened holes on the side of the case for USB and micro USB ports, widened space for screen and drilled holes for x/y buttons.
I left a small ledge around the edge of the display area to attach a screen protector - once that arrives I'll file down the edges further to neaten it up.
You can see I made a small mistake with the dremel at the top of the display - I'm hoping I can cover that up, perhaps by painting a black border on the inside of the screen protector.
Finally, I removed some components from the pcb and cut it down to size for the buttons. I've temporarily screwed it into the case to see how everything looks.
image.jpeg
One thing I've noticed is I definitely need button wells for the x/y buttons. I bought a spare set of DMG buttons to use off eBay as I wanted the colour to match but now I have to find button wells from somewhere.
Looking good. You can get some spare button wells by sawing them off from a cheap USB Snes controller. That's what I did atleast.
Re: Jjj's GBZ
Posted: Tue May 10, 2016 6:10 pm
by crispy_tofu
Yeah, getting a cheapo SNES controller seems to be the best course of action for the button wells
Re: Jjj's GBZ
Posted: Tue Jun 07, 2016 12:28 am
by jjj
I finally found some more time to work on this last night, so here is where I've got to so far:
I had been trying to follow part 2 of Wermy's guide, soldering onto the pcb traces but after two whole evenings with almost no progress, I decided to try something different. I used an old CD case as the base for my controller board, dremmelled it down to size and drilled holes in it for mounting. After checking everything lined up properly I added copper tape to create traces in the right places and soldered all of the wires on. I also added some heat-shrink to keep all the wires in one place.

I was actually surprised how strong the solder connections between the wires and copper tape were, but the heat from the soldering iron made the copper tape start to peel away from the plastic in places so I used hot glue to keep everything in place.
I also added the button wells for x/y from a cheap USB SNES controller

They need filing down a bit to reach the same height but that's a job for another day.

