Page 1 of 2
Liath's GBZ - First build questions
Posted: Mon Aug 05, 2019 8:31 am
by Liathou
Hi,
I'm building my first Gameboy Zero, using Tinkerboy V3.
I already gathered all I need to start this awesome project.
I'm not really confident when it comes to electronics or soldering (I will train myself before diving in), so I need your help.
So, I have some questions:
- Can someone please check my wiring diagram ? (image included in spoiler tag below)
- What do I do with the white wire coming from the screen ?
- Can I use other 5V pin on the Tinkerboy V3 to power other things (like the screen) ? Or do I need something else (like a "power strip") ?
- For L1/R1 buttons, is there a polarity or it doesn't matter ?
I'm French, so If I'm not clear, please tell me, I'll try to explain.
Thank you for your help !
WIRING DIAGRAM

Right-click -> "Open image in a new tab", if it's too small

Re: Liath's GBZ - First build questions
Posted: Mon Aug 05, 2019 9:14 am
by rodocop
Hey there, your diagram looks good. I see you have the power switch between the ground though. That is fine, but I usually put the switch on the 5v line. But it should act the same the way you have it wired.
To answer a few of your questions.
The white wire can just be cut off. It is typically just AV2 (yellow is AV1). Use white or yellow, no need for both.
Provide the tinkerboy board with 5v from your power supply like you have. You can now you any 5V labelled pad on the PCB to provide power to your components. You do not need a seperate power strip.
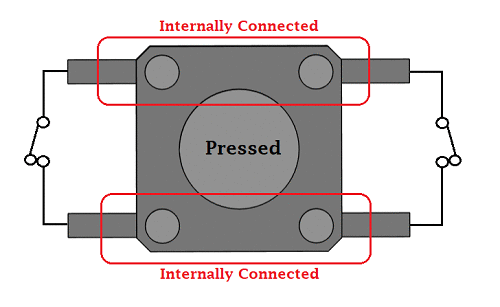
For shoulder buttons. are you using 2 pin or 4 pin tactile buttons, if 2 pin, no need to worry. If using 4 pin you just need to make sure you use the right two pins. See this diagram here which will illustrate a bit better. in this case you would wire ground to the top or bottom, and the signal to the opposite. You can see the top left and right pins are internally connected, and same with the bottom, you just don't wan't to wire you signal and ground to the ones the are internally connected.
Re: Liath's GBZ - First build questions
Posted: Mon Aug 05, 2019 3:08 pm
by Liathou
Thank you for your fast reply, I appreciate that

Now I have another question about those shoulder buttons. I got the ones provided by Tinkerboy with his Add-On Board. They are 4 pins buttons, so, my next question is : how do I figure out which pins are connected ? (do I put my trust in the plastic lines things ?) (again, image in spoiler tags)
My guess : the top 2 are connected, as well as the bottom 2.
Thank you !
Re: Liath's GBZ - First build questions
Posted: Mon Aug 05, 2019 4:51 pm
by rodocop
Yeah. You are correct about the buttons. You can always confirm with a multimeter if you have the audible beep continuity setting.
Also, the buttons should only fit in one orientation the rear PCB.
Re: Liath's GBZ - First build questions
Posted: Tue Aug 06, 2019 9:00 am
by Effin Enjeffin
Don't let an expensive Tinkerboy board be your first attempt at soldering. Find some broken electronics and practice de-soldering and soldering it's through-hole components first. Or get a cheap ebay electronics kit on ebay for practice. Or practice solding resistors to perfboard.
Re: Liath's GBZ - First build questions
Posted: Tue Aug 06, 2019 2:06 pm
by Liathou
Thanks, that's a good advice. Newbies like me should practice first ! (I said it
)
Don't worry, I'll practice first, I don't won't to ruin my board. You're right, they're quiet expensive and the wait time is a bit too long.
A coworker gave me a (don't know what it's called, sorry) PCB "full of holes" he doesn't need to practice on. I soldered about 15 wires on it so far : wire on the hole, wire through the hole, solder on the other side.
I'm just starting to feel confident, plus my father can help me if needed. I'll train some more tomorrow.
@Rodocop : Thanks, the idiot in me didn't even try to place the buttons in the PCB... you're right, they only fit in the right orientation
Thanks again.
Re: Liath's GBZ - First build questions
Posted: Wed Aug 07, 2019 4:09 pm
by Liathou
Hey,
I have another question. Can I "fold" the yellow ribbon thing from the screen ? It kind of sticks out, so I think I need to fold it somehow :/
Re: Liath's GBZ - First build questions
Posted: Wed Aug 07, 2019 6:26 pm
by rodocop
You can fold it down. Just be careful with them.
Re: Liath's GBZ - First build questions
Posted: Sun Sep 08, 2019 1:44 am
by Liathou
Hi there,
I have another problem. Unfortunately I can't quite figure where it's coming from.
I wired everything but the add-on board (which is usb, volume wheel, and L1/R1), I'm pretty confident my wiring is fine, the system boots up and I get to Retropie main screen (console selection).
But the controls are not working. I know the board is powered cause I checked, and there were 5V between 5V and GND pads on the V3. I also checked with a voltmeter (is it the good word ?) that there's no bridge between my solder points (PP22/PP23), but it may be hard to see on the photo.
I think the problem is on the software side (either that or something is toasted on the V3).
I don't know if there's a led on the V3 that lights up when powered, but if that's the case, nothing on the V3 lights up.
I'm using Tinkerboy's retropie 4.4 image.
I plugged in a keyboard once to get the Pi's mac, so maybe that's the cause.
SSH is enabled, so maybe there's some kind of log I can read, or status commands to try ?
I'm so close to get it working !

Thanks for your help
Re: Liath's GBZ - First build questions
Posted: Sun Sep 08, 2019 8:51 am
by infinitLoop
Liathou wrote: ↑Sun Sep 08, 2019 1:44 am
Hi there,
I have another problem. Unfortunately I can't quite figure where it's coming from.
I wired everything but the add-on board (which is usb, volume wheel, and L1/R1), I'm pretty confident my wiring is fine, the system boots up and I get to Retropie main screen (console selection).
But the controls are not working. I know the board is powered cause I checked, and there were 5V between 5V and GND pads on the V3. I also checked with a voltmeter (is it the good word ?) that there's no bridge between my solder points (PP22/PP23), but it may be hard to see on the photo.
I think the problem is on the software side (either that or something is toasted on the V3).
I don't know if there's a led on the V3 that lights up when powered, but if that's the case, nothing on the V3 lights up.
I'm using Tinkerboy's retropie 4.4 image.
I plugged in a keyboard once to get the Pi's mac, so maybe that's the cause.
SSH is enabled, so maybe there's some kind of log I can read, or status commands to try ?
I'm so close to get it working !
Thanks for your help
I think it looks like you have the d+ and d- reversed from the pi to the board
From a command prompt you can run “lsusb” to see if it’s recognizing more than the built in hub

