Page 2 of 4
Re: 3D Printing: Back Button Assembly with Fan Vent
Posted: Tue Jul 12, 2016 7:17 am
by uke
this is awesome! great work!
Re: 3D Printing: Back Button Assembly with Fan Vent
Posted: Tue Jul 12, 2016 9:46 am
by tronicgr
chiz wrote:As some of you know, I'm currently in search of a solution for cooling down my GB Pi2. Also, as I'm testing the re-used shoulder buttons in the back of my GB Pi2, I feel that it could still be improved, particularly ergonomics.
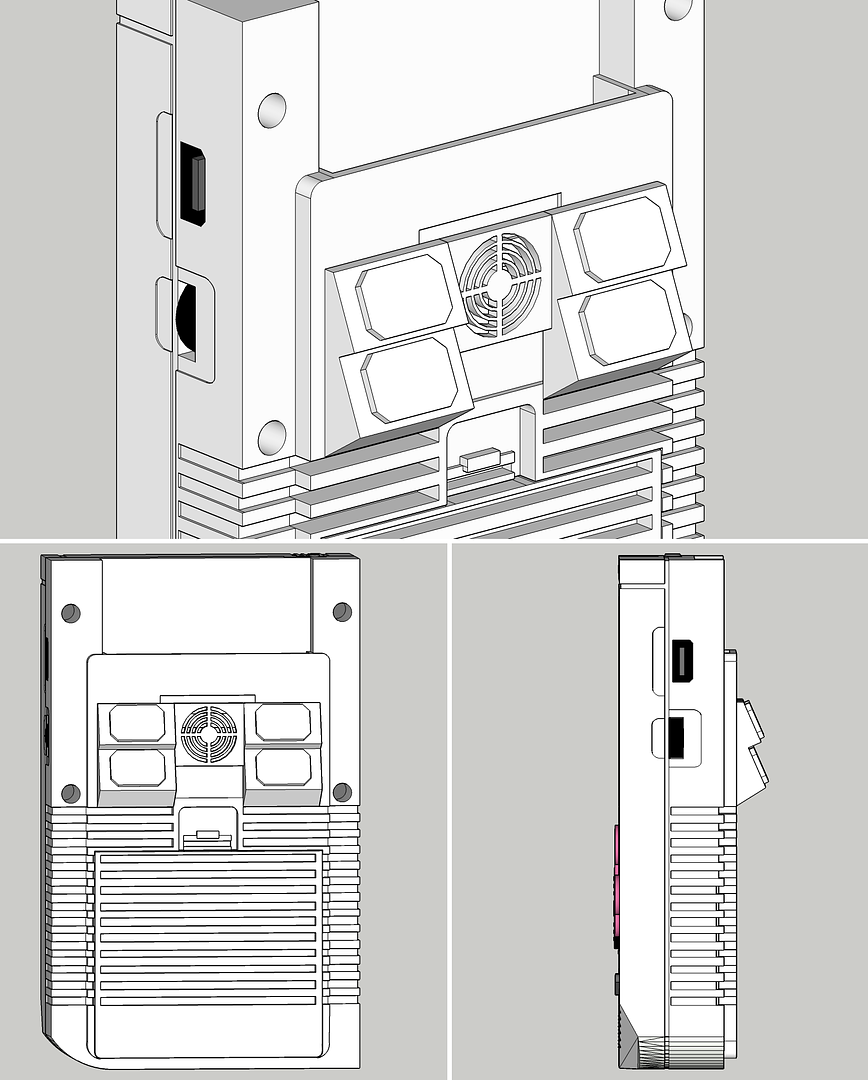
Combining the a solution for the two (2) needs, I came up with this -- back button assembly with vent. This assembly will allow additional 4 buttons in the back in a slanted position for better ergonomics plus a vent for a cooling fan. This should require minimal modding in the case to bore a hole for the fan and 1 to 2 small holes for the wires to connect to the buttons.
The Pi Zero might not need the cooling but one can still get benefit from the slanted back buttons
Hi,
Can you share the gameboy case 3D model? Which software you are using for it? I was thinking to add mounts for the electronic parts and 3D print the whole thing. The 3d printer I have can handle very accurate dimensions and surfaces.
Thanks
Thanos
Re: 3D Printing: Back Button Assembly with Fan Vent
Posted: Tue Jul 12, 2016 2:26 pm
by dirtybeagles
chiz wrote:@Fleder
I thought of putting the buttons in the battery cover. However, I feel that area is too low for the index and middle fingers to reach.
Also if you wanted a larger batter in the GBPi2, putting buttons on the cover might get in the way. My battery is 5000mAh and it barely fits as is.
Re: 3D Printing: Back Button Assembly with Fan Vent
Posted: Tue Jul 12, 2016 10:24 pm
by chiz
@tronicgr
PM me your email so I can send a copy.
I'm using Sketchup and the model is available in the 3D Warehouse. Not my work though and not to scale. I had to tweak it a bit to make it close to the DMG-01 dimensions but still not very accurate. I just use it to visualize case mod ideas.

Re: 3D Printing: Back Button Assembly with Fan Vent
Posted: Wed Jul 13, 2016 12:18 am
by Fleder
dirtybeagles wrote:chiz wrote:@Fleder
I thought of putting the buttons in the battery cover. However, I feel that area is too low for the index and middle fingers to reach.
Also if you wanted a larger batter in the GBPi2, putting buttons on the cover might get in the way. My battery is 5000mAh and it barely fits as is.
I am not planing on using a bigger battery. I just thought that would be a simple method of getting more space without using glue or screws

Re: 3D Printing: Back Button Assembly with Fan Vent
Posted: Wed Jul 13, 2016 4:52 am
by MauroS
Amazing mod idea.
Re: 3D Printing: Back Button Assembly with Fan Vent
Posted: Thu Jul 14, 2016 7:27 pm
by Helder
If you can get this made properly we can can make a pcb with a flex ribbon attached to it so it can be thin and flexible instead of having 4 or 5 wires going through the case to the controller boards.
Re: 3D Printing: Back Button Assembly with Fan Vent
Posted: Thu Jul 14, 2016 8:11 pm
by chiz
Helder wrote:If you can get this made properly we can can make a pcb with a flex ribbon attached to it so it can be thin and flexible instead of having 4 or 5 wires going through the case to the controller boards.
Sure! Let me know how this design can still be improved to easily integrate into the PCB. This design is no means final already as it's just a draft of how I envisioned it so I can get it out of my head

Feel free to provide inputs and I'll revise accordingly.
Re: 3D Printing: Back Button Assembly with Fan Vent
Posted: Thu Jul 14, 2016 8:51 pm
by Helder
Got some dimensions for space for the pcb? Also the buttons I'd like to see the back end of them.
Re: 3D Printing: Back Button Assembly with Fan Vent
Posted: Thu Jul 14, 2016 9:07 pm
by chiz
Right now I'm contemplating whether the design should use a 3D-printed button or re-used buttons, say from a cheap knock-off NES/SNES controller using the round buttons. However, traditionally, shoulder buttons like the ones in the SNES, PS4, XBox, etc., are all rectangular buttons.
The benefit of using a 3D-printed button is one will not have to buy a controller just to cannibalize the buttons. However, 3D printed buttons will not have smooth walls that might not glide smoothly against the button holes.
Nonetheless, I'll post an updated design assuming 3D-printed buttons together with dimensions.
Do you have any immediate design change in mind that I can do to make the integration even easier? Or the design is fine as is at the moment?
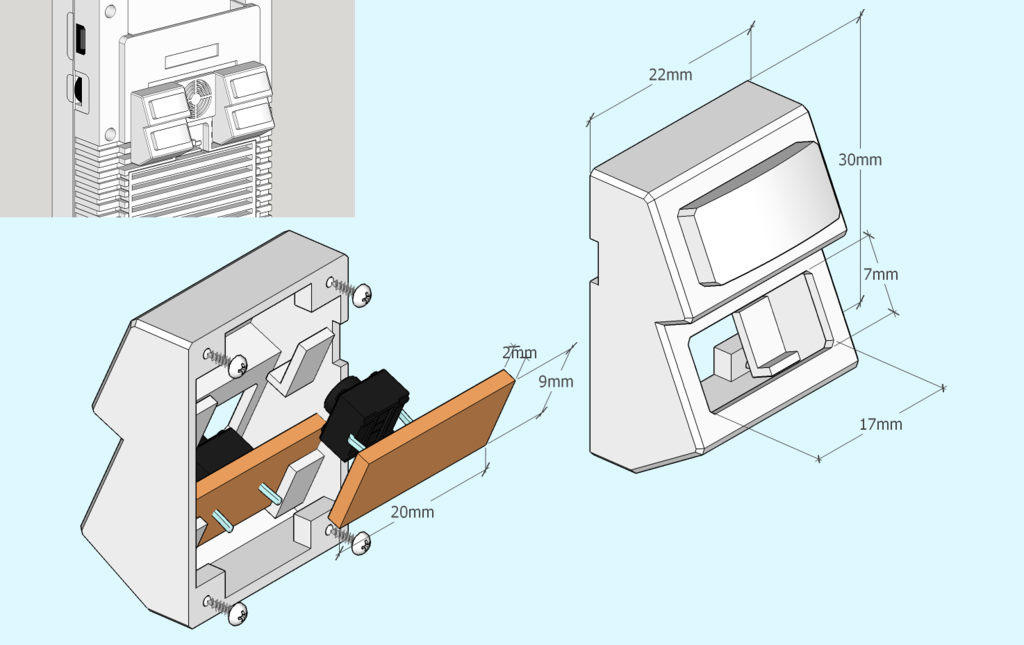
Update:
Here's the revised model complete with dimensions @Helder
Also had the time to polish design to show how the final design would like. I decided to use 3D-printed buttons so it would match the overall design. Button now has convex surface for better ergonomics.