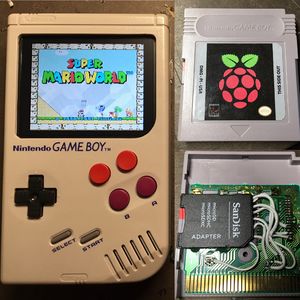
Difference between revisions of "Game Boy Zero"
From sudomod
m (→Guides: Added misc guides link) |
|||
| (24 intermediate revisions by 7 users not shown) | |||
| Line 1: | Line 1: | ||
| + | [[File:Game Boy Zero.jpg|right|thumb]] | ||
| + | |||
| + | ==Guides== | ||
| + | |||
| + | * [http://sudomod.com/game-boy-zero-guide-part-1 Part 1 - Modifying the case] | ||
| + | * [http://sudomod.com/game-boy-zero-guide-part-2 Part 2 - The Controls] | ||
| + | * [http://sudomod.com/game-boy-zero-guide-part-3 Part 3 - The Screen] | ||
| + | * [http://sudomod.com/game-boy-zero-guide-part-4 Part 4 - Mounting and Wiring ] | ||
| + | * [http://sudomod.com/game-boy-zero-guide-part-5 Part 5 - Cartridge Reader and Audio ] | ||
| + | * [http://sudomod.com/game-boy-zero-guide-part-6 Part 6 - Everything else ] | ||
| + | * [[misc_guides | Part 7 - Miscellaneous Guides, Tips, & tricks]] | ||
| + | |||
==Hardware== | ==Hardware== | ||
| − | + | ||
| − | + | * [[GBZ Main Board|Main Board]] | |
| − | + | * [[Screens|Screens]] | |
| − | + | * [[GBZ Screen Cover|Screen Cover]] | |
| − | + | * [[GBZ Controller Input|Controller Input]] | |
| − | + | * [[GBZ Buttons|Buttons]] | |
| − | + | * [[GBZ Power Supply|Power Supply]] | |
| − | + | * [[GBZ Battery|Battery]] | |
| − | + | * [[GBZ Audio Amplifier|Audio Amplifier]] | |
| − | + | * [[GBZ Speaker|Speaker]] | |
| + | * [[GBZ Usb Hub|Usb Hub]] | ||
| + | * [[GBZ Usb DAC|Usb DAC]] | ||
| + | * [[GBZ USB Charging Port|Micro USB Port]] | ||
| + | * [[GBZ Misc Hardware|Misc]] | ||
==Software== | ==Software== | ||
| − | + | ||
| − | + | * [[RetroPie]] | |
| − | + | * [[recalbox]] | |
| − | + | * [[EmulationStation]] | |
| − | + | * [http://www.lakka.tv/ Lakka TV] | |
==Recommended Tools== | ==Recommended Tools== | ||
| − | + | ||
| − | + | * [http://www.banggood.com/Triangular-Wing-Y-Screwdriver-Tool-for-Nintendo-DS-Wii-GameBoy-p-967104.html?p=9B1915347037201311DI Tri-wing screwdriver] (the screws in the GB case aren’t normal phillips-head screws) | |
| − | + | * [http://www.banggood.com/3_8mm-4_5mm-Game-bit-Nes-Screwdrivers-For-Nintendo-N64-Gameboy-p-939908.html?p=9B1915347037201311DI Tool to open game cardridges] | |
| − | + | * Soldering iron (and solder, of course) | |
| − | + | * Electrical tape | |
| − | + | * [http://www.banggood.com/50mmX20m-Copper-Foil-Tape-Single-Conductive-EMI-Shielding-Adhesive-p-976256.html?p=9B1915347037201311DI Copper tape] (for adding new buttons to the controller board) | |
| − | + | * Dremel Rotary Tool | |
| − | + | * X-acto knives | |
| − | + | * Hot glue gun | |
| − | + | * Epoxy | |
| − | + | * Other basics like screwdriver set and all that. | |
| + | |||
==FAQ== | ==FAQ== | ||
Latest revision as of 20:38, 29 November 2017
Contents
Guides
- Part 1 - Modifying the case
- Part 2 - The Controls
- Part 3 - The Screen
- Part 4 - Mounting and Wiring
- Part 5 - Cartridge Reader and Audio
- Part 6 - Everything else
- Part 7 - Miscellaneous Guides, Tips, & tricks
Hardware
- Main Board
- Screens
- Screen Cover
- Controller Input
- Buttons
- Power Supply
- Battery
- Audio Amplifier
- Speaker
- Usb Hub
- Usb DAC
- Micro USB Port
- Misc
Software
Recommended Tools
- Tri-wing screwdriver (the screws in the GB case aren’t normal phillips-head screws)
- Tool to open game cardridges
- Soldering iron (and solder, of course)
- Electrical tape
- Copper tape (for adding new buttons to the controller board)
- Dremel Rotary Tool
- X-acto knives
- Hot glue gun
- Epoxy
- Other basics like screwdriver set and all that.
FAQ
- Could you fit this in a Game Boy Color/Pocket?
- It would be a very, very tight fit and you’d likely have to forego the SD card cartridge reader.
- How do you get audio out of the Pi Zero?
- Adafruit has a great guide for using PWM audio out of the GPIO pins: https://learn.adafruit.com/adding-basic-audio-ouput-to-raspberry-pi-zero/overview . A small USB sound card is also an option.
- What’s the battery life like?
- 3.5-4 hours on a 2000mAh battery.
- Can’t you just buy a Game Boy shell to use since all the insides get replaced anyway?
- The original project used several internal pieces from the Game Boy, including the controller board, headphone jack, power switch and cartridge reader. It is possible to use a custom PCB for the controls, aftermarket power switch and headphone jack, but you would have to forego the SD Card cartridge adaptor.
